
Datorama : Two-Factor Authentication
When we first create a user for you, you will receive a welcome email from “noreply@datorama.com.” The subject of the email should be Welcome to Intelligence, and it will contain your user email and an auto-generated password.
In order to log in and view your Datorama dashboard, you’ll need to log in using that password, set yourself a new password, and then set up Two-factor authentication (2FA).
Two-factor authentication doesn’t provide access to Datorama by itself. It only verifies that the person logging in is the same person who set the account up in the first place. Each person who owns a user account with access to your client dashboard will need to set up their own 2FA.
Registering
Click the Get Started button in your email.
After logging in using the credentials given to you in the welcome email, you will be prompted to create a new password. Enter it and click Update, then log in again using your new password.
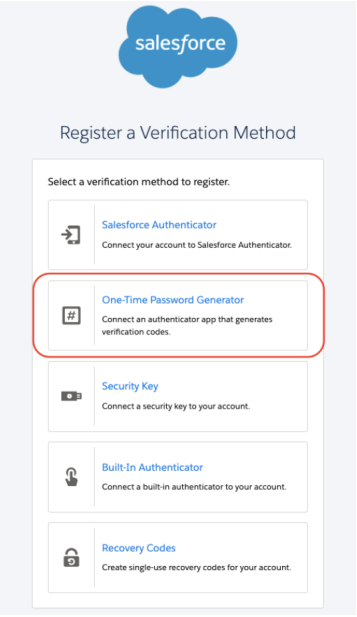
Next, you will see a page asking you to Register a Verification Method. You will see several options available to you:
Salesforce Authenticator: Not applicable for this use-case. Do not use.
One-Time Password Generator: This utilizes a separate, free, “authenticator” app which will provide you with a code. You’ll need to open the app and enter this code, which changes every 30 seconds, whenever you log into Datorama. This is the option we recommend using, and which the rest of this article will walk you through setting up.
Security Key: This utilizes a USB drive which you would need to purchase and carry around with you in order to log in on a device. We do not recommend this option.
Built-In Authenticator: Available if your device has a fingerprint scanner or facial recognition (eg Touch ID or Microsoft Hello). This is a viable option, but you will need to set it up on each individual device you plan on logging into Datorama through.
Recovery Codes: This is not a viable option for everyday authentication. It generates a handful of codes which must be saved for future reference and can be “used up.” Do not use except as an additional backup measure should you so choose.
Select the second option: One-Time Password Generator. You’ll be taken to a page with a QR code.
Connect an Authenticator App
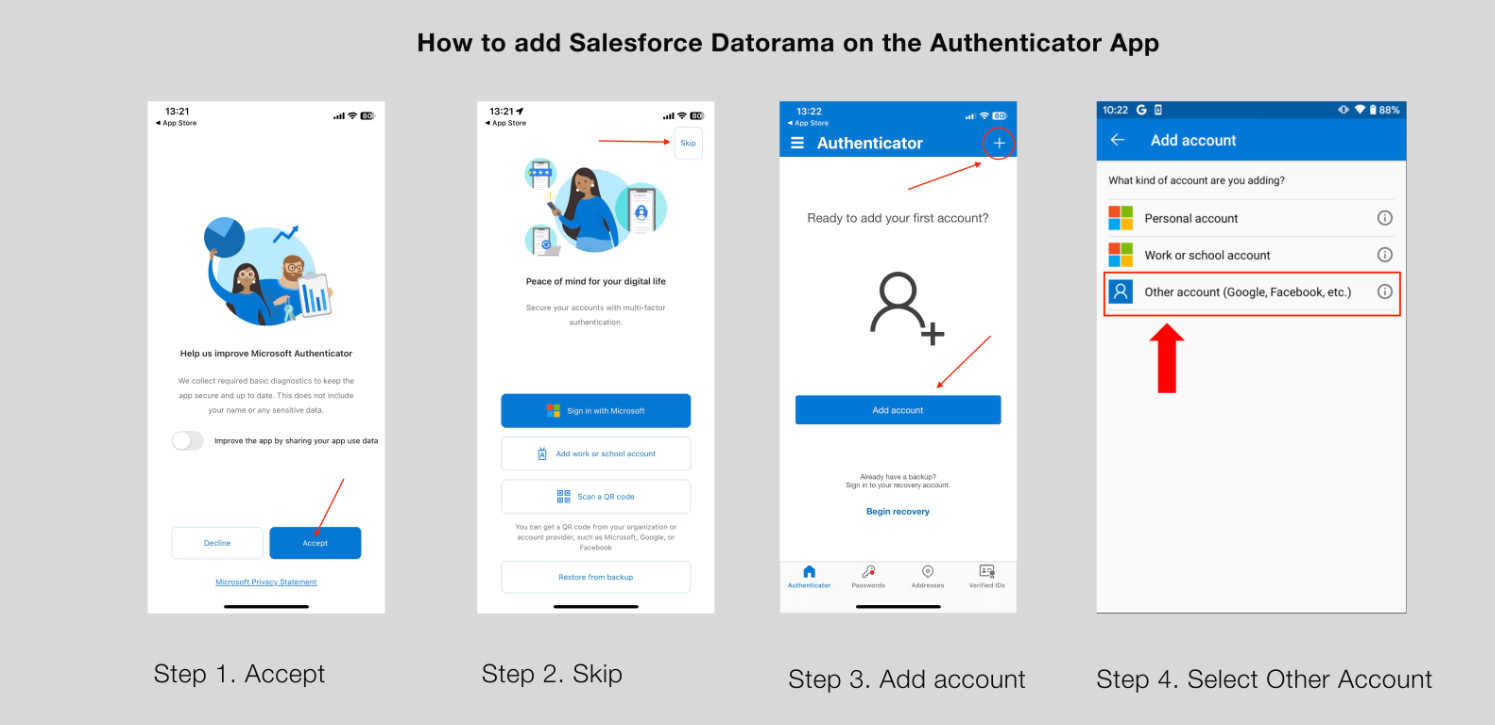
We recommend using the Microsoft Authenticator app. If you don't already have it downloaded on your mobile device, you’ll need to do so. Download links: Android Play Store / iOS App Store
If you are already using and familiar with a different authenticator app, such as Google Authenticator, you can use that instead of Microsoft’s.
If you are downloading the Microsoft Authenticator app for the first time, follow the steps in the screenshot and steps below to set up and add an account for authentication.
Tap on the + button to add a new account. Then, select Other account from the options provided.
Scan the QR Code you were provided by Datorama in your browser.
After scanning, the app will generate a code for you to enter. Input the verification code in the Verification Code field.
In the Verifier Name field, we’d suggest using “RAIN Datorama” or something similar so it’ll be easy for you to identify on future logins.
Click Connect
You can now securely log in using your email address, the password you chose, and a code from your authenticator app!