
Setting Up A Server-Side GTM Container Using Google Cloud Platform
How long will it take?
We anticipate it should take you 45-60 minutes to complete your Google Cloud Run setup.
10-15 min to set up & share GTM container
0-10 min to set up Google billing account
15-20 min to configure Cloud Run server
It will also take you about 10 minutes more to set make necessary edits to your DNS records.
Total: 35-55 minutes.
Accesses Needed:
You’ll need access to a Google account with admin access. This should be the same account used to set up the client-side GTM, GA4, etc. This is needed in order to set up the below 3 items:
GTM container
Google Billing account
Configure the GTM server in Cloud Run.
To add DNS records, you’ll need DNS registrar account access.
You’ll also need access and authority to use a company credit card to set up a Google billing account.
Automatically provisioning a server in Google Cloud Platform (GCP) is comprised of 5 parts.
Part 1: Establish a GTM Container for Server-Side Tracking
Go to tagmanager.google.com, making sure you’re logged into the correct Google account for your organization. Preferably, it should be the same account that owns any other Google products you have set up (other Google Tag Manager accounts, Google Analytics properties, etc).
Find the existing account where your GTM web container exists, and click the … menu button, then click Create Container.
We suggest using the URL of your website to name your container
(For the purposes of this example, we will be using yourcompanydomain.com)
Select Server from the “Target Platform” list.

If you don’t see an existing account, create a new one by clicking Create Account:

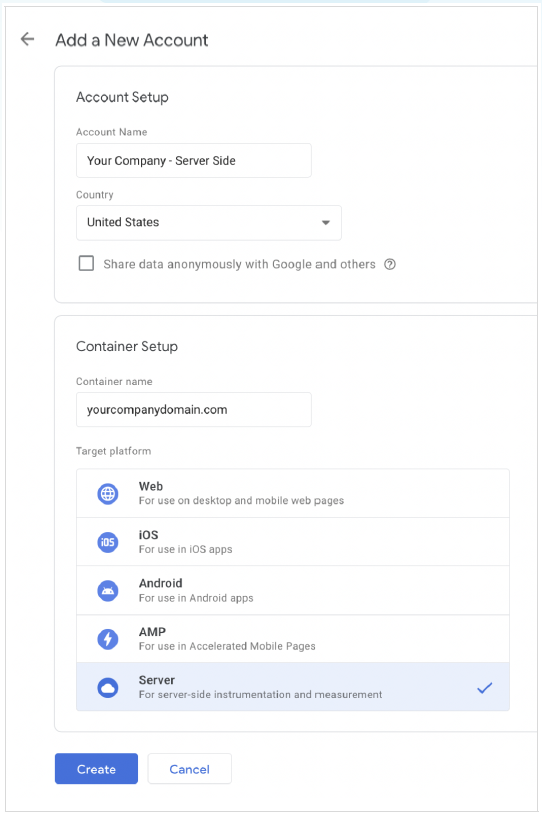
On the Account Setup screen:
We suggest using the format “Your Company – Server-Side”) to name your account.
Leave the country as United States
Leave the box for sharing data anonymously unchecked
We suggest using the URL of your website to name your container
(For the purposes of this example, we will be using yourcompanydomain.com)
Select Server from the “Target Platform” list.
Click Create and accept the data processing agreement
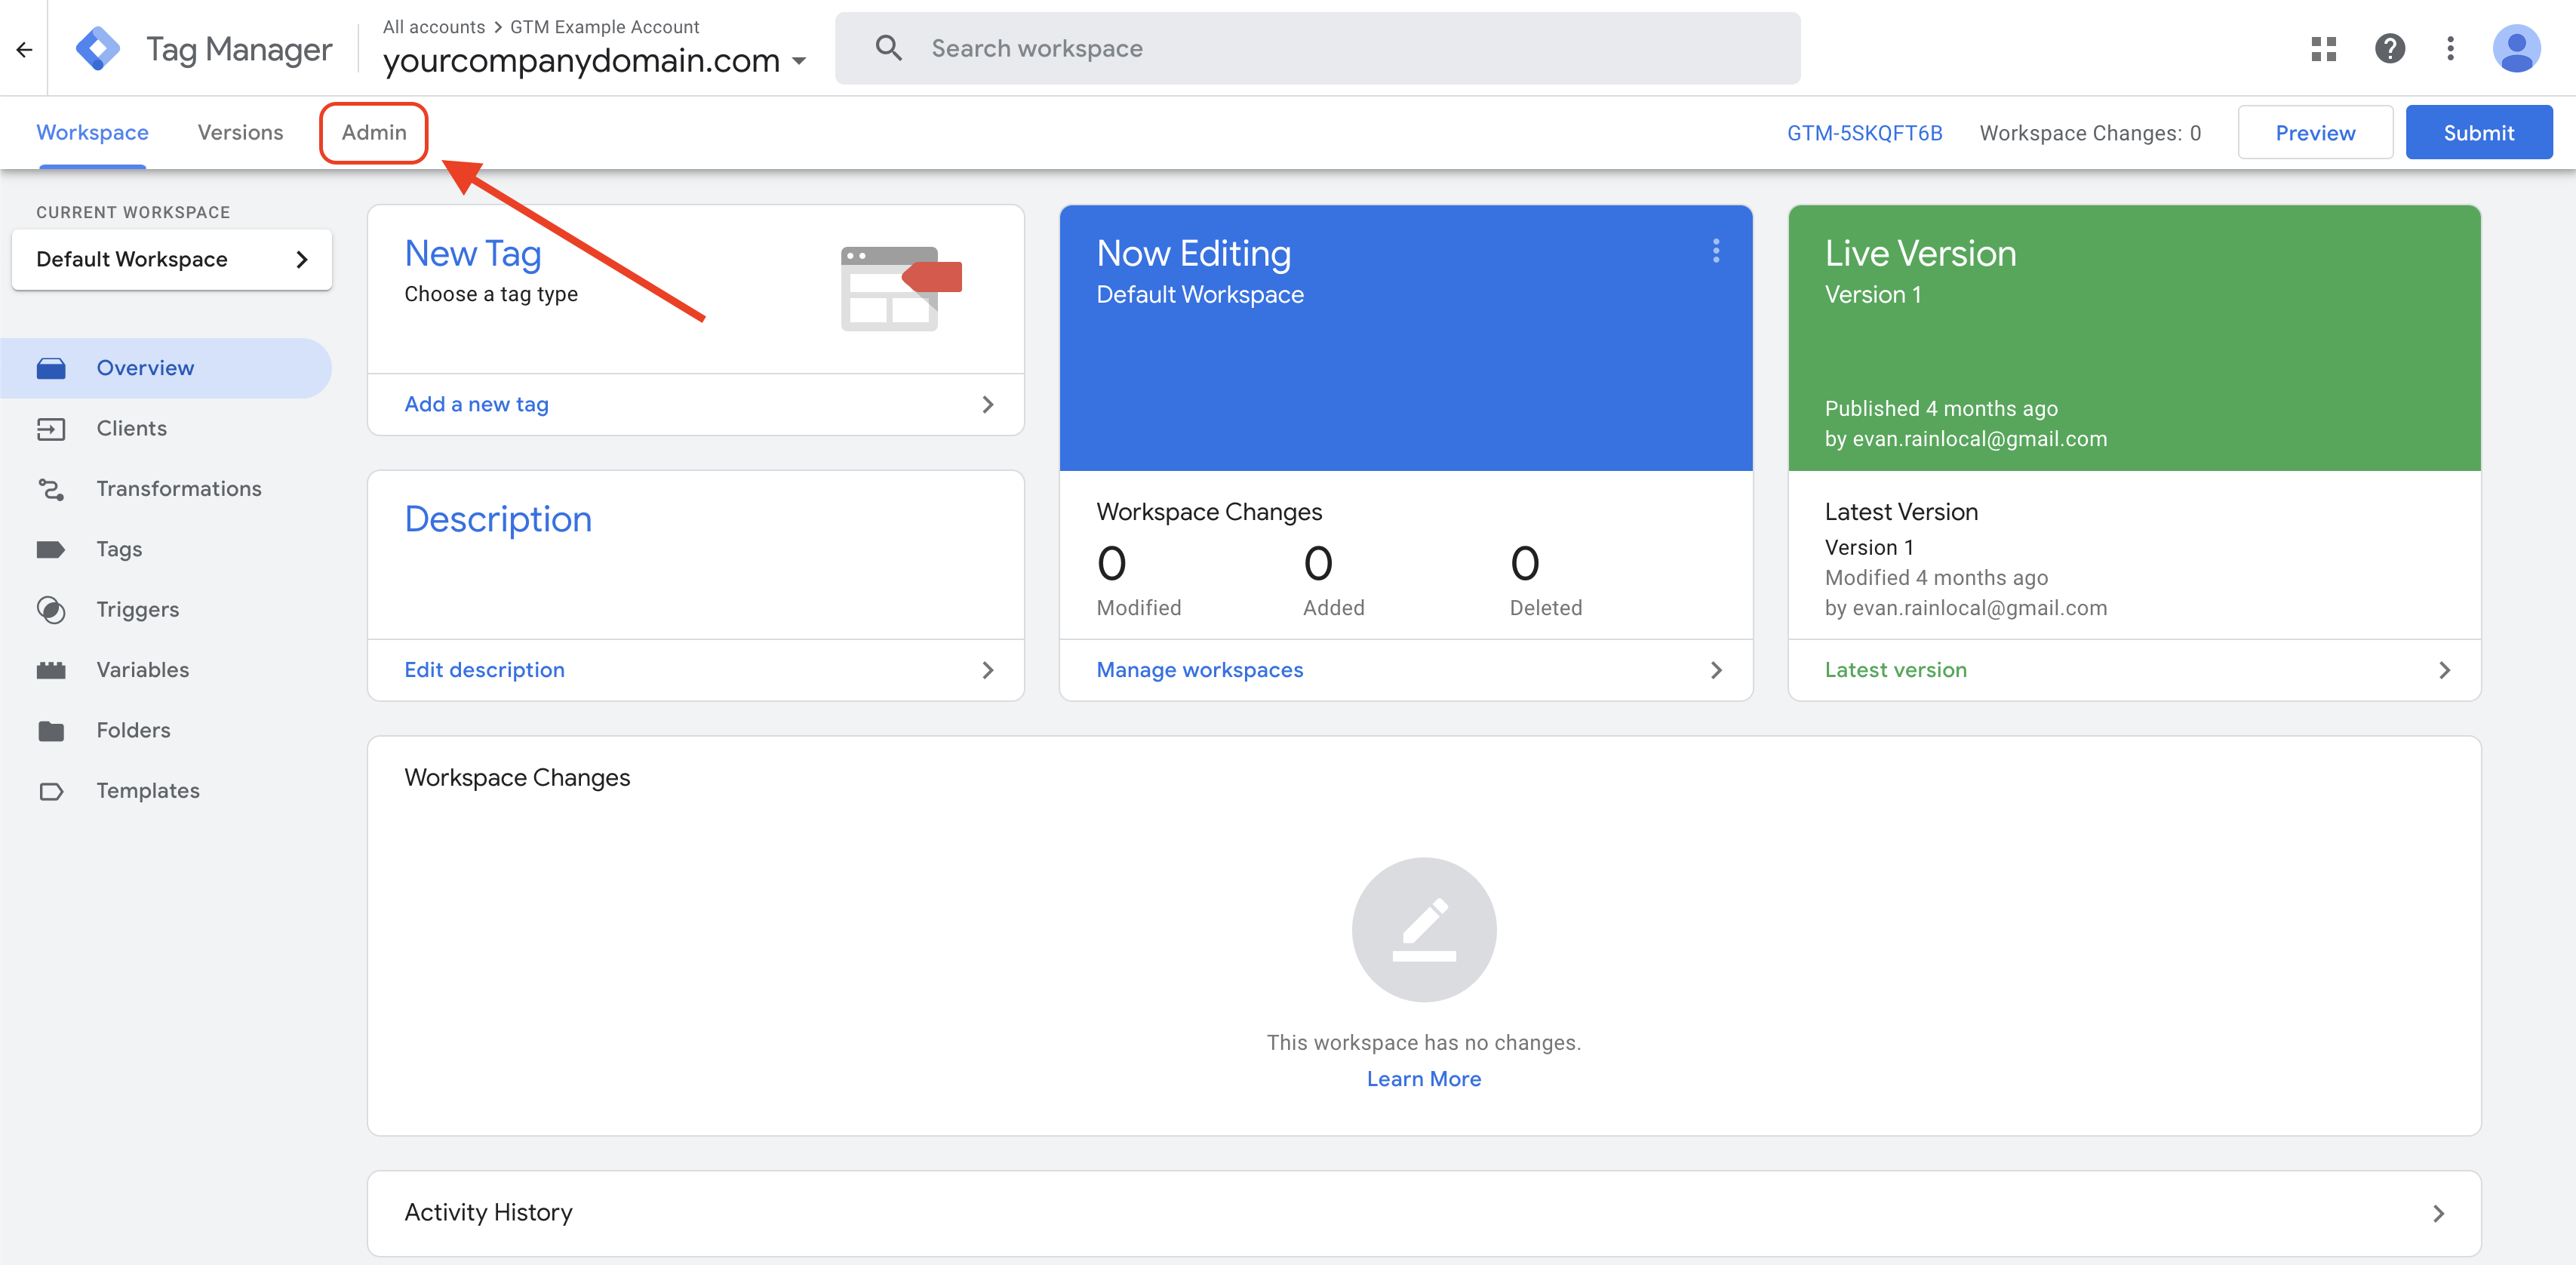
Your Server-Side Google Tag Manager (“SSGTM”) container is now created, and you will be sent to the Tag Manager interface. The first thing you see will be a pop-up asking you to set up a tagging server. Select Automatically provision tagging server.
Part 2: Set Up a Tagging Server in Google Cloud Platform
To move forward from here, you’ll need a billing account. If you already have one, it may be automatically selected. Once you’ve verified it has the correct payment information, select it, click Select billing account and create server, then once your server has been created, proceed to Part 3.
Steps to create a Billing Account:
If you need to create a new billing account, do so now. You’ll simply need to agree to the terms, add your payment information, then click Submit (button text may vary). Immediately after creating a billing account, you should be returned to the same screen where you originally clicked Automatically provision tagging server. If everything looks good, click Select billing account and create server. Again, once you’ve clicked this button and your server has been created, proceed to Part 3.
If you don't see the billing account you just created yet, Google may just need a minute—try refreshing the page. (Don’t click 'Create a billing account' twice)
If you weren’t returned to the right screen, here’s how to navigate back:
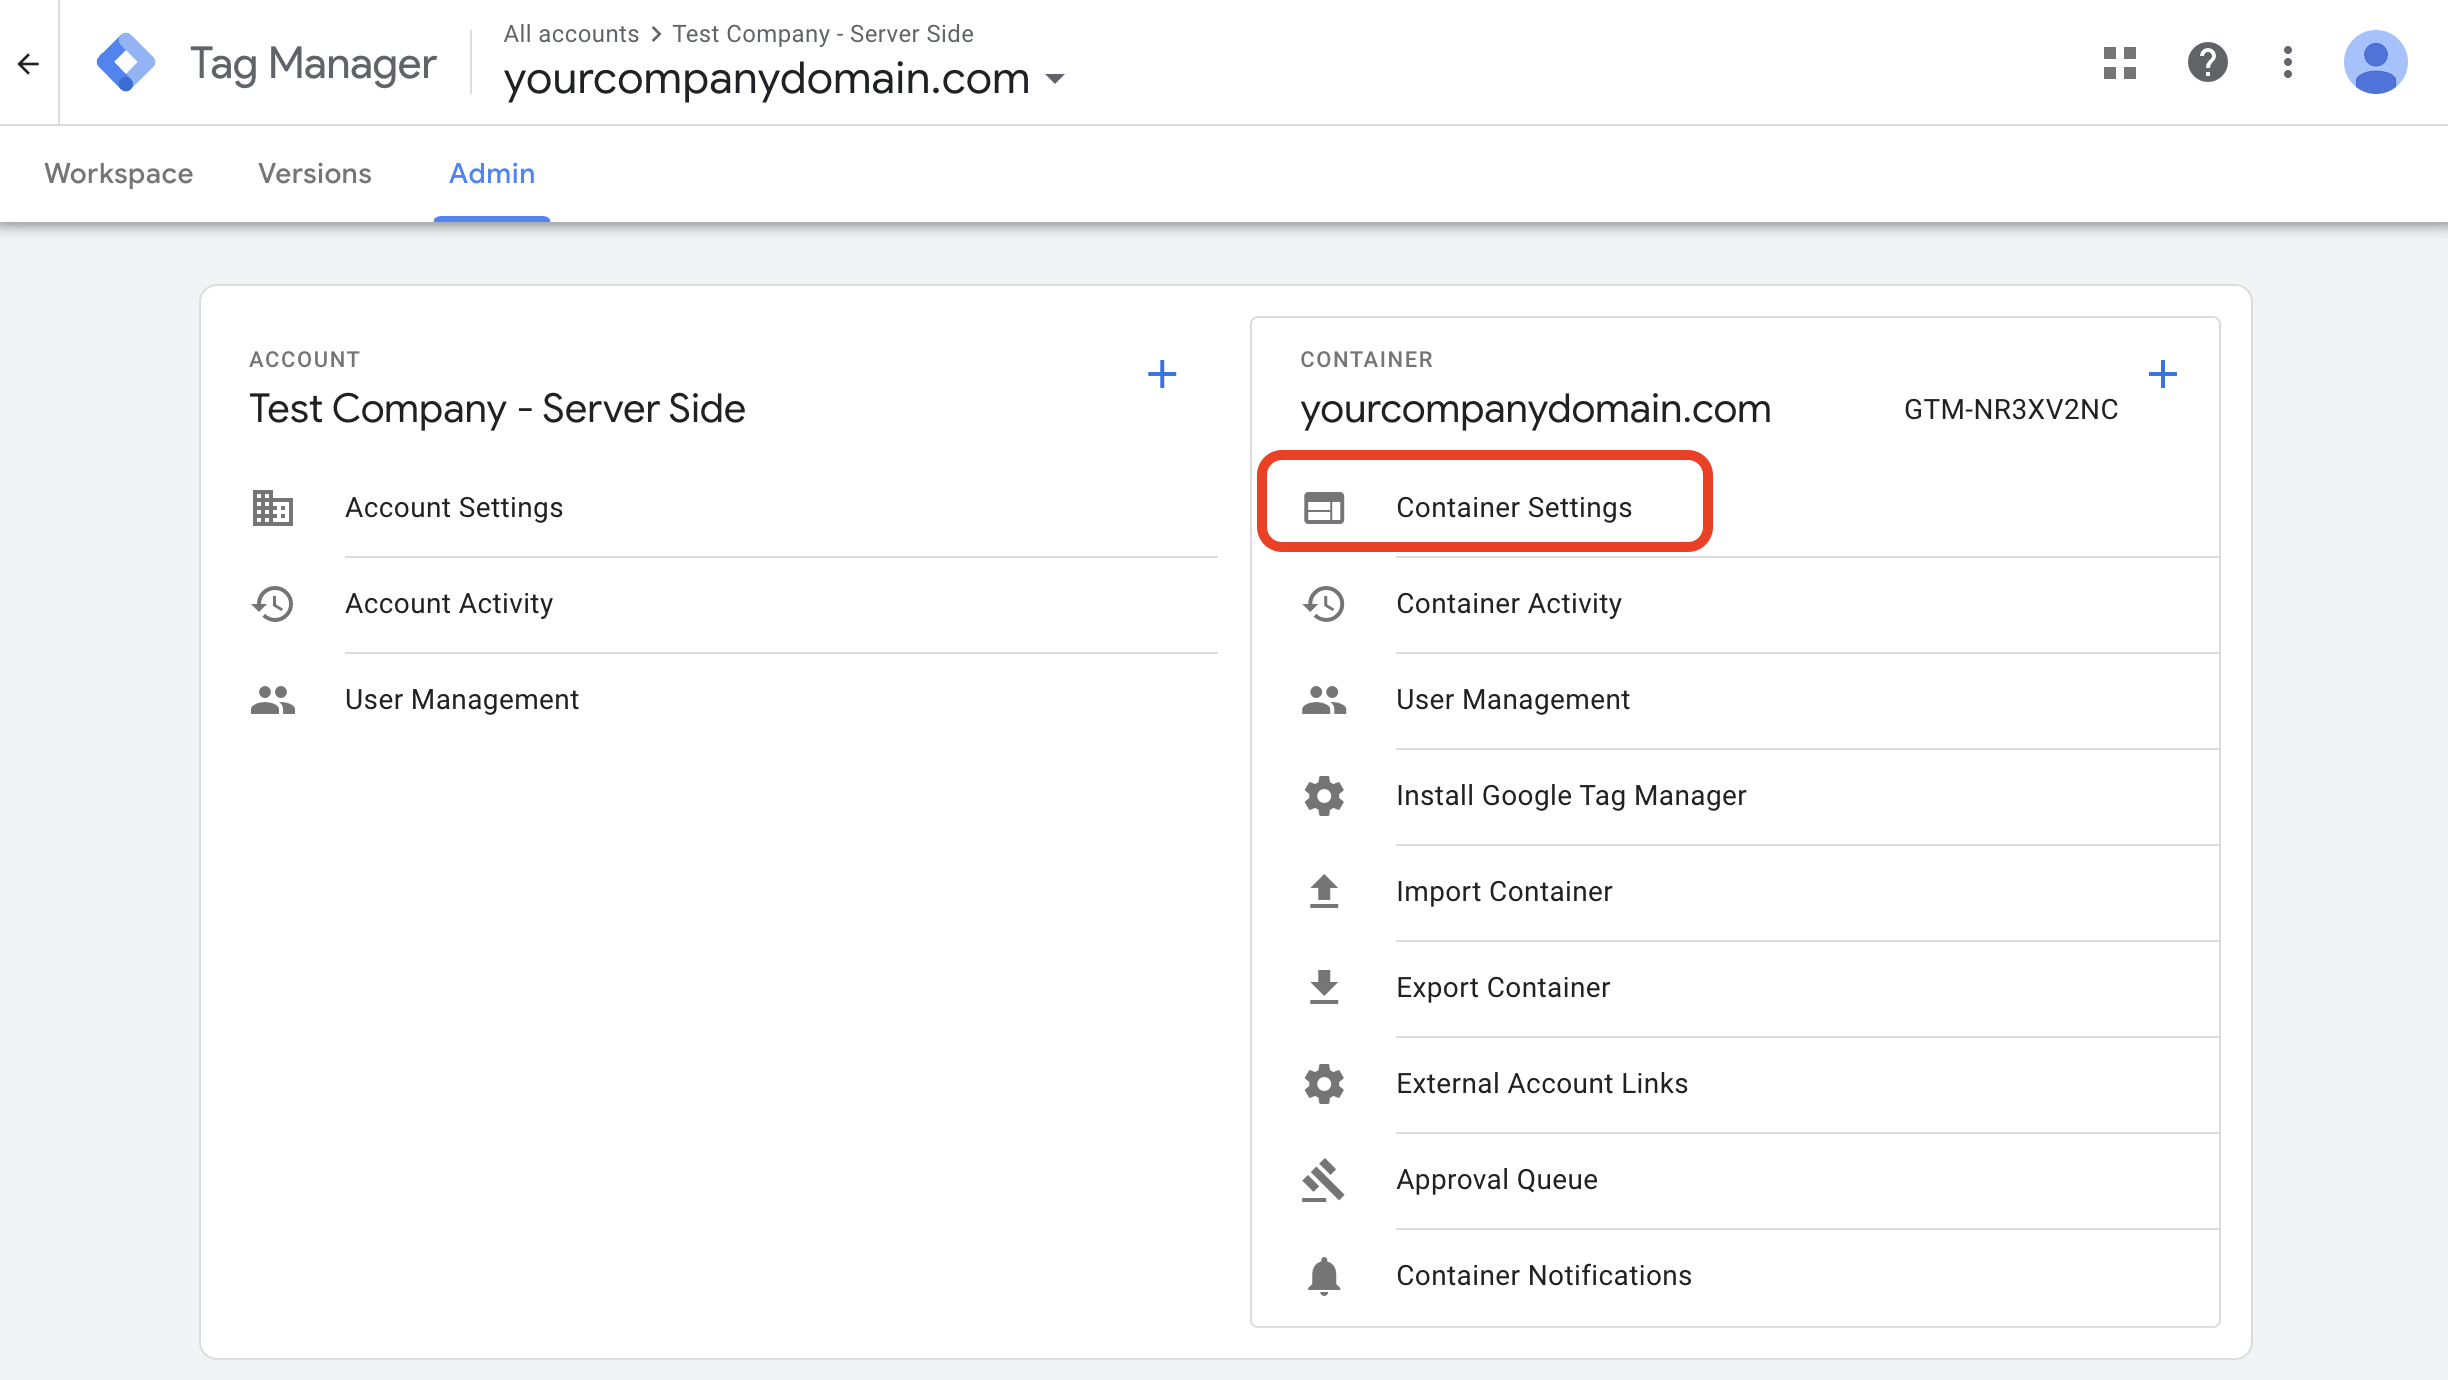
From the Tag Manager interface (tagmanager.google.com), find the GTM Container with type “Server” you just created, and click on it.

You will be sent to the home screen of your SSGTM account. Click on the Admin tab.
Click on Container Settings at the top of the list on the right.
Click on Set up your tagging server
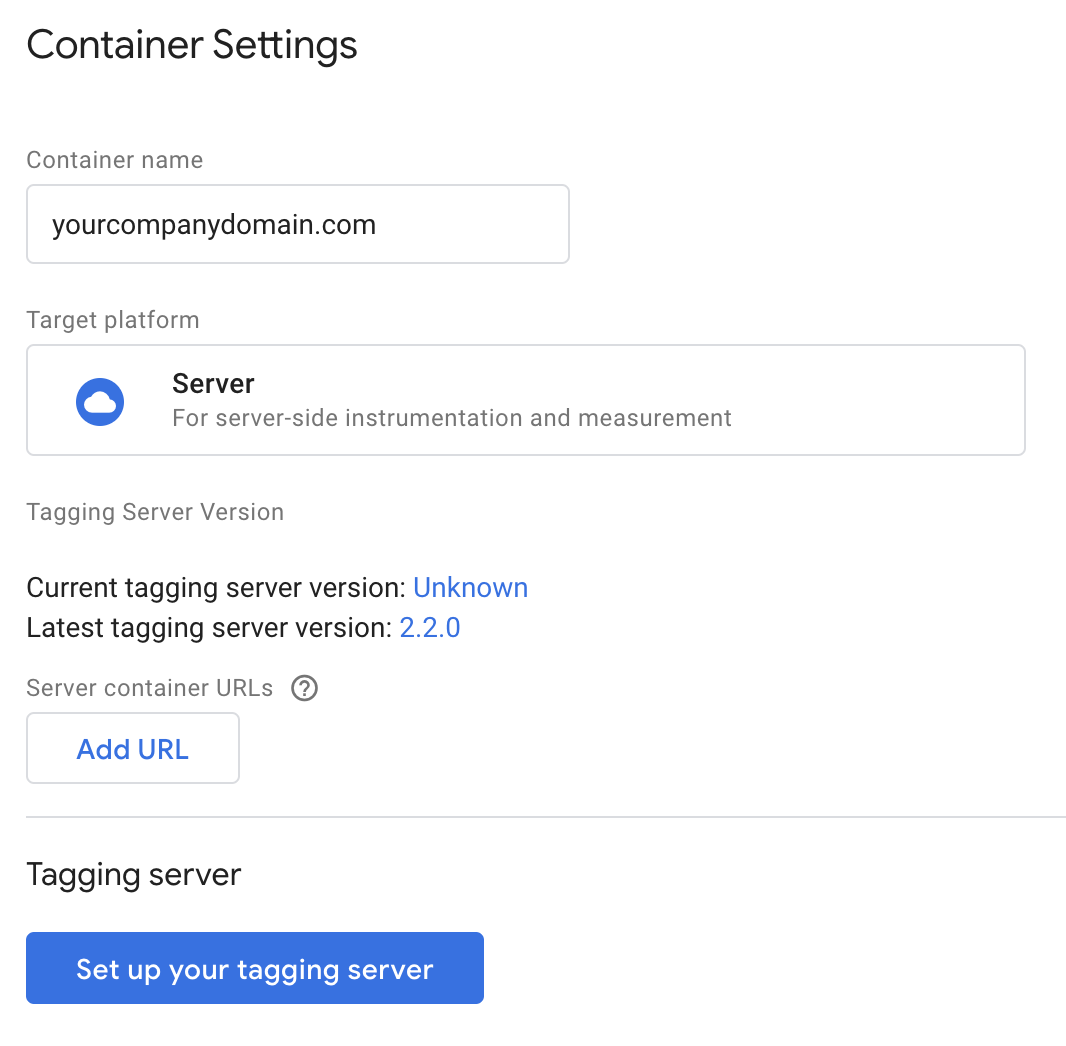
Click Automatically provision tagging server.
Select your billing account from the drop-down, and finally, click Select billing account and create server.
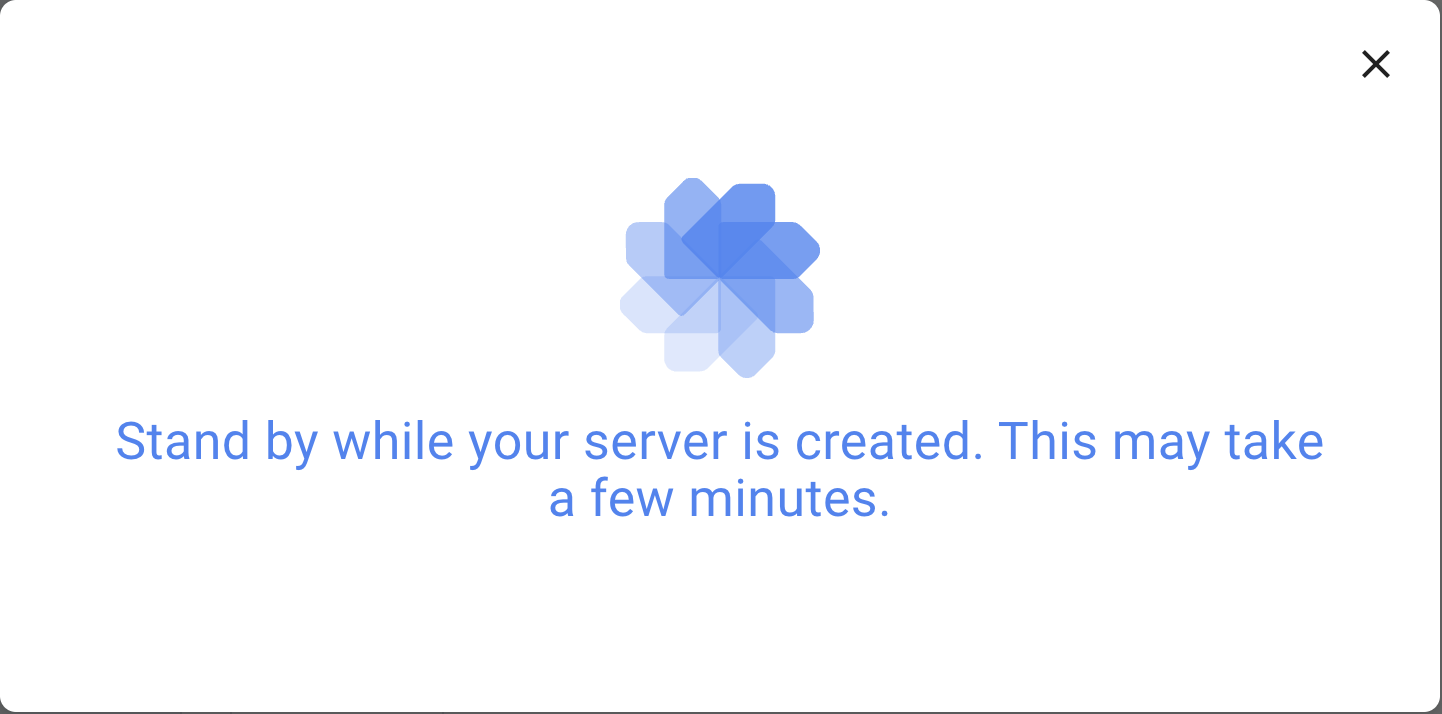
Finally, Google will create your server. (It will likely take a few minutes)

Part 3: Configure and Verify a Custom Domain
Once your server is created, setting up a custom domain is essential for maximizing the benefits of server-side tagging.
A custom domain ensures cookies are classified as first-party instead of third-party, improving data accuracy, persistence, and tracking reliability across browsers and extensions that restrict third-party cookies.
Navigate back to Container Settings (in the Admin tab of tagmanager.google.com).
Under the “Google Cloud Platform Project ID” section, click the outbound link icon to go to the Google Cloud Server associated with the Server-Side Tag Manager.

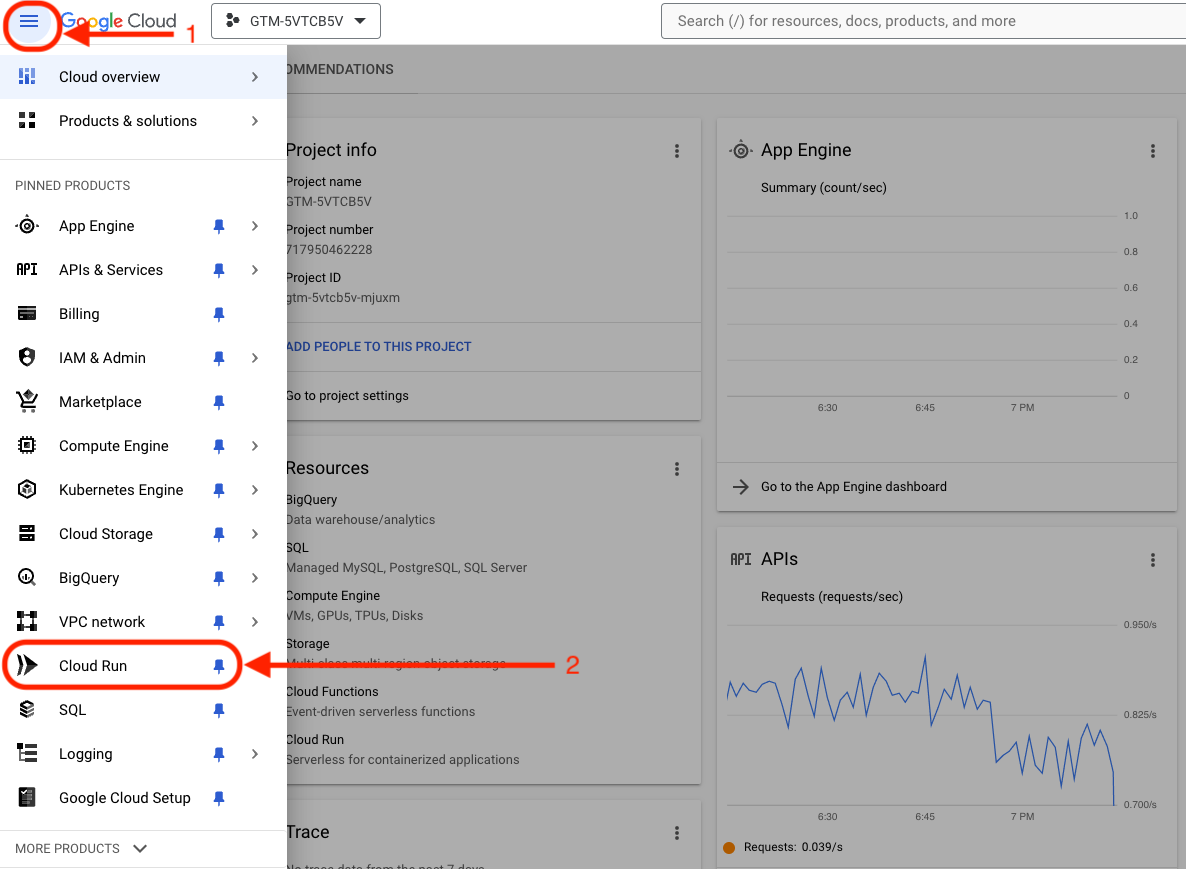
A new tab will open displaying your server’s dashboard at console.cloud.google.com. Click on the 3 horizontal lines in the top left of the screen and within the Products menu, find and select Cloud Run.
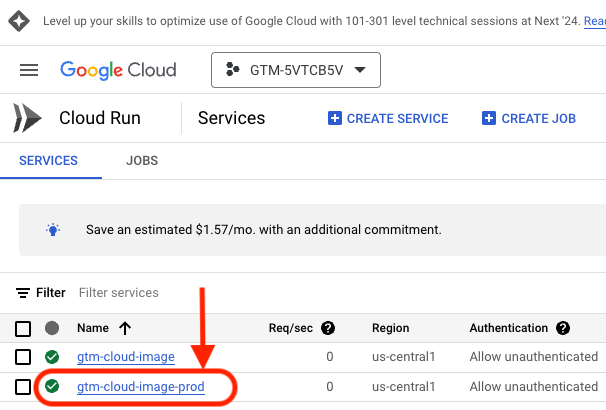
Here, you will see two servers which could be labeled a few different ways. You want to find and click on the live server. (This will be named without a suffix at all, or with a “prod” or “live” suffix. It will not have a “preview” or “debug” suffix.) For example:
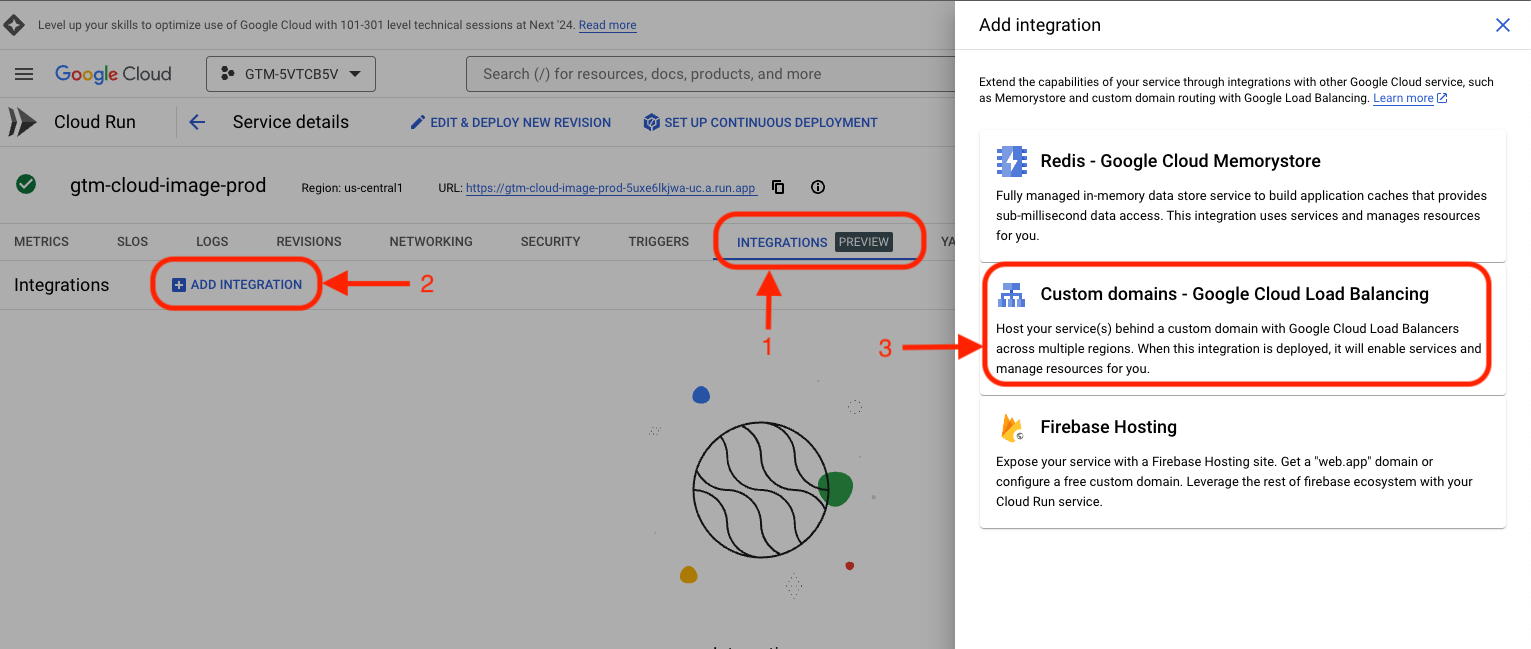
Once you open the live server instance, click the INTEGRATIONS tab, then click + ADD INTEGRATIONS, then finally click Custom domains - Google Cloud Load Balancing
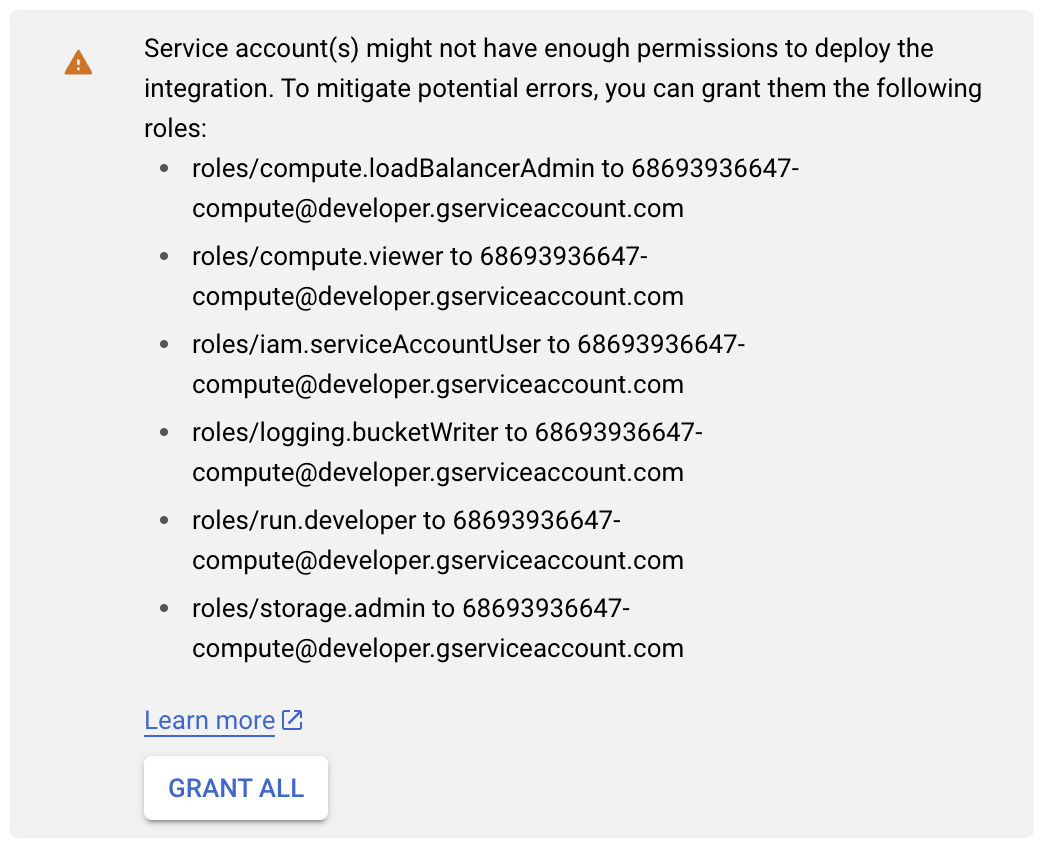
If you see an error message similar to the one in the screenshot below, click GRANT ALL.
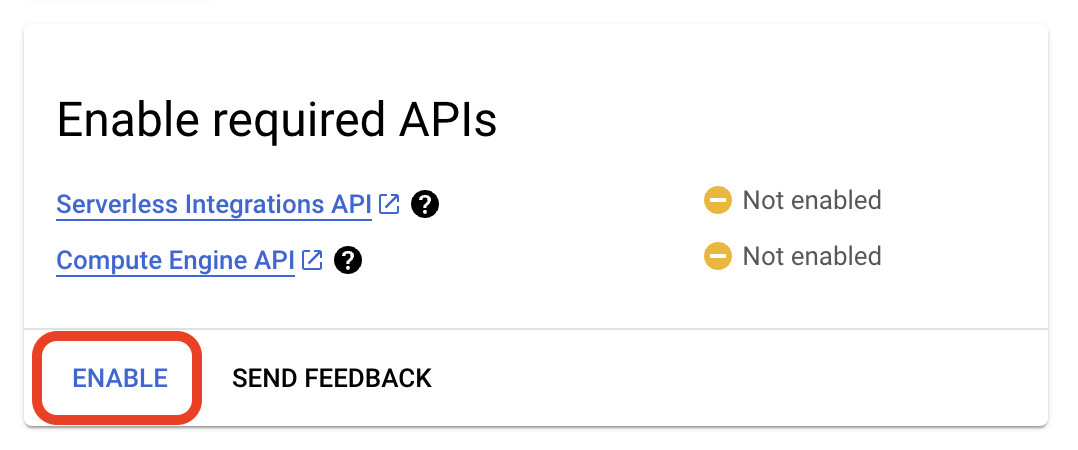
If you see a notification that some APIs must be enabled, click ENABLE.
Under “Routes,” fill in Domain 1 with the full URL of the subdomain you’d like to use. Leave the “Path 1” and “Service 1” fields as they were. Then, click Submit at the very bottom of the page.
In the example below, we have used “gtmss“ as the subdomain but the full URL would be “gtmss.yourcompanydomain.com”. You could use “ss”, “ssgtm”, or any other subdomain you’d like. This URL will potentially be visible, at least momentarily, to customers in some situations/browsers.
It will take a few minutes to complete the setup.

After a few minutes, you will see the DNS records that you need to add in your website’s DNS provider. They’ll be at the bottom of the “Integration Details“ screen in the “Connect to Custom Domain” section.
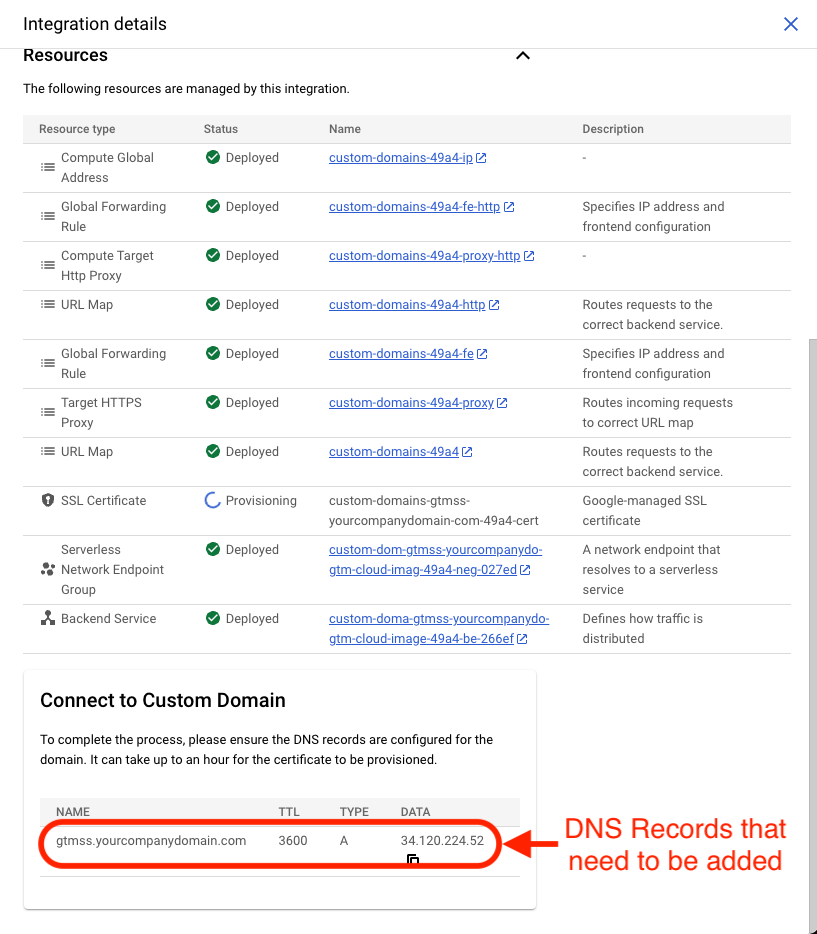
Note: you won’t see “Deployed” for SSL Certificate until you have completed Part 4 below.
Part 4: Edit Your Website’s DNS Records
Now it’s time to create and point the subdomain you just chose (e.g. gtmss.yourcompanydomain.com) to the GTM server you’ve created.
You will need to log in to your domain name registrar and create a new DNS record for the subdomain you want to use. Here are the DNS record specifics you would use from the example in the screenshot above. (These items will be different for you!)
Type: A
Host or Name: gtmss
“DATA”, “IPv4 address”, “Points To”, or “Value”: 34.120.224.52
TTL: Auto or Default (no need to change to 3600 as seen in the screenshot)
Proxy status: Disable (If you don’t see Proxy status as an editable field, don’t worry. It will be disabled by default.)
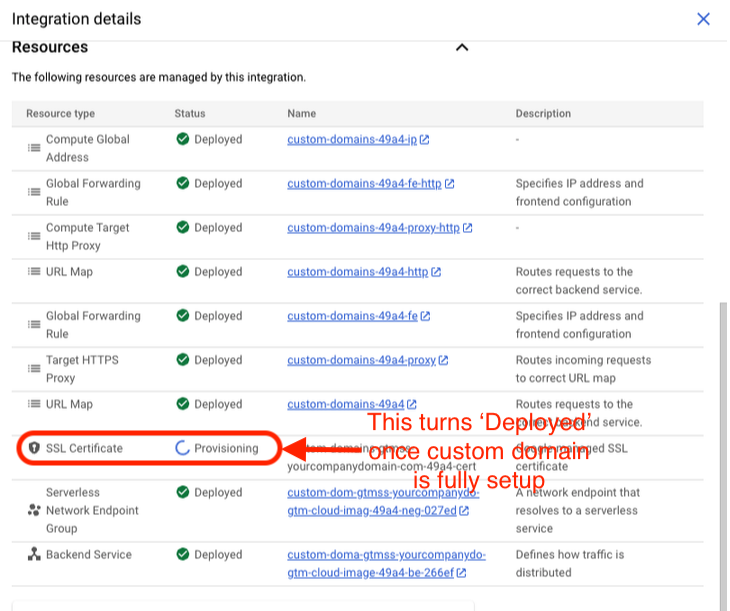
It usually takes a few hours, and may take up to 72, to fully set up the custom domain. Once the domain is completely added and verified, you’ll see the SSL Certificate field turn “Deployed“ under the Integration Details as seen in the screenshot below.
Important Note:
1. If you have a Content Security Policy (CSP) enabled, you must add the server endpoint (the new subdomain you created) as a trusted source in your CSP. This should be added to both connect-src and script-src directives. Otherwise, the browser will block those requests.
Furthermore, the below cases may be relevant, depending on your set-up.
2. Explicitly Define Google Tag Manager in CSP
Include rules for GTM’s client-side scripts in script-src and ensure that any dynamically loaded resources (e.g., analytics.js or gtag.js) are accounted for.
3. Use Nonce or Hash for Inline Scripts
If your implementation requires inline scripts (e.g., custom JavaScript in GTM), use CSP with nonces or hashes to allow only trusted inline scripts to execute.
Please get in touch with our team if needed! Oftentimes, it can take some time to determine what steps are needed, and some testing may be required. This is normal, and we’re used to it. We’re happy to troubleshoot any specific cases with you, just let us know!
Part 5: Configure GTM Container + Grant Rain Access
Next, you’ll need to configure your new custom domain in the GTM Server container you created during Part 1. Start by navigating to tagmanager.google.com. You may still have that tab open. (Again, please ensure you are logged in and using the correct Google account—Google has a bad habit of randomly switching the account you’re logged into.)
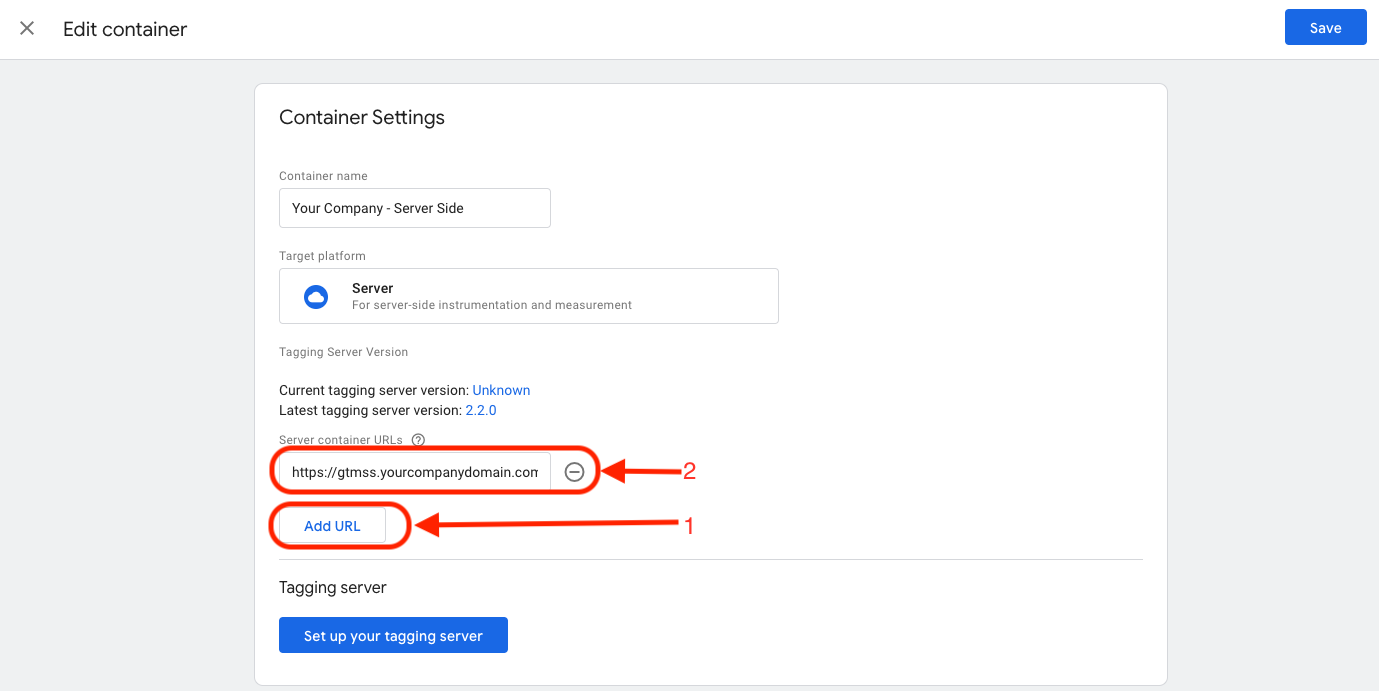
Navigate to your Container Settings (Click your container -> Admin tab -> Container Settings)
Click Add URL, paste in the custom domain you just set up (adding “https://” to the beginning), and click Save.
Share Access with RAIN
The below steps will not be necessary if you created your GTM server container in a pre-existing account which we already have admin access to.
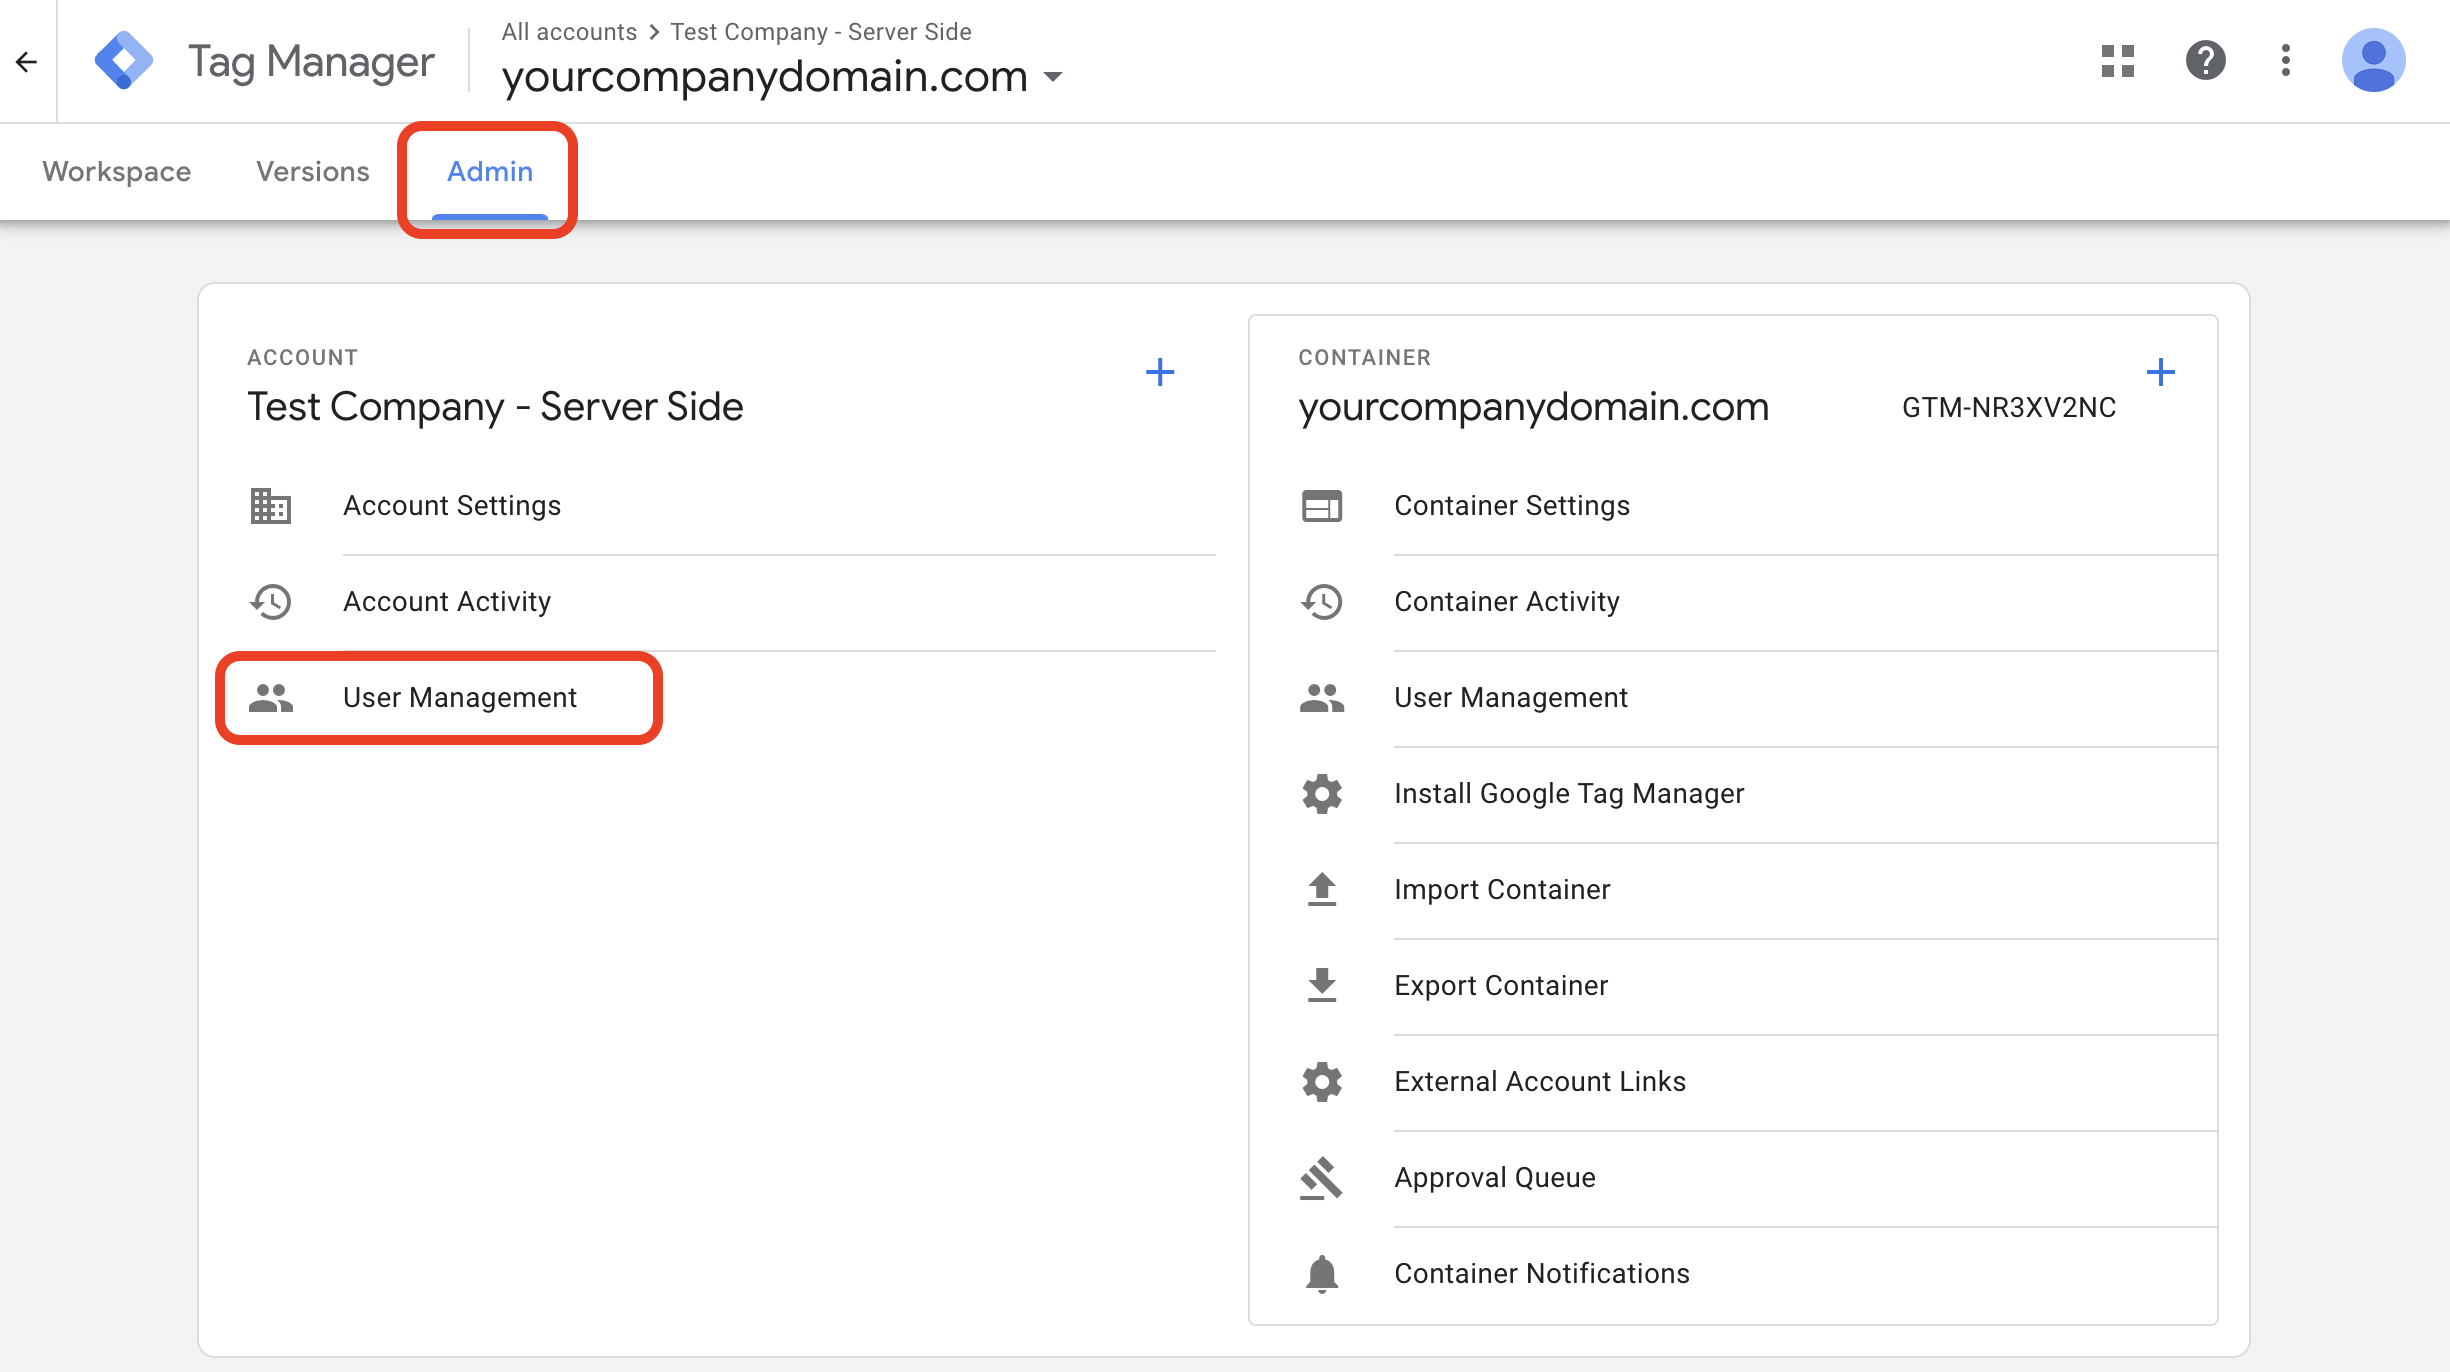
Navigate back to your Google Tag Manager account at tagmanager.google.com (again, ensuring you are logged in and using the same Google profile).
Click on your Server-Side Container → Admin → User Management
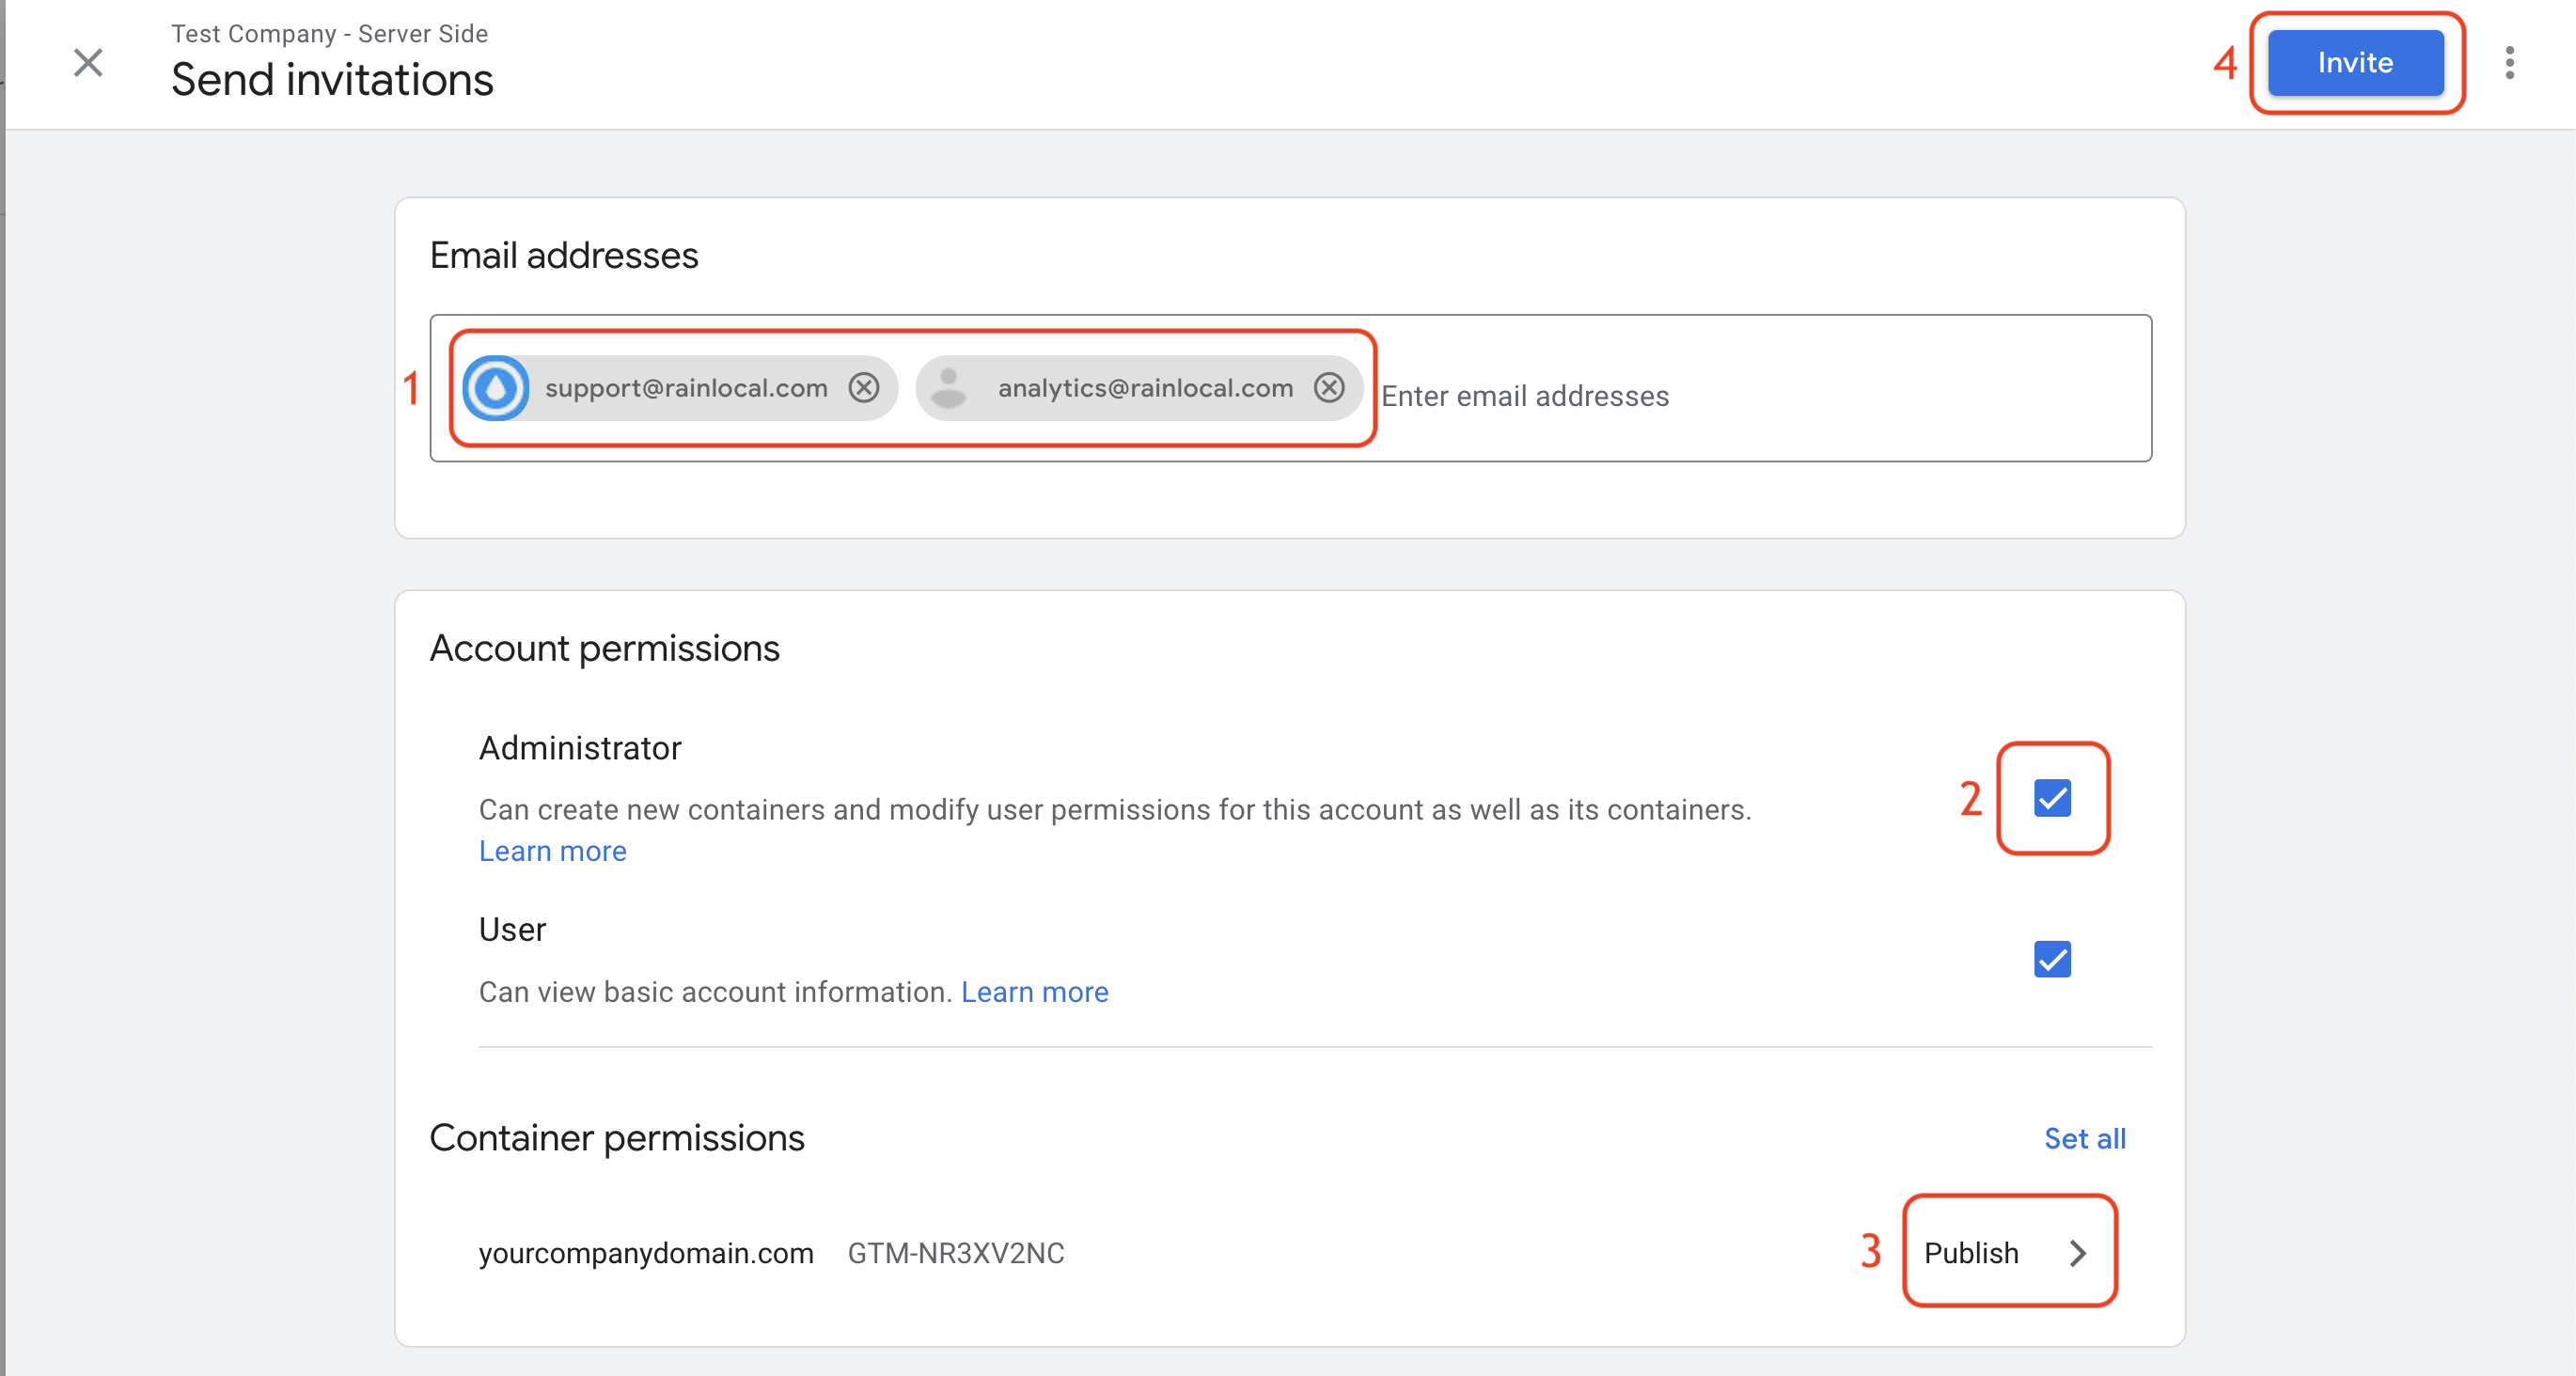
Click the blue ✚ icon in the top right and select Add Users

Enter “support@rainlocal.com” and “analytics@rainlocal.com” into the Email addresses field.
Check the box for Administrator access, then click Invite.
(Alternatively, you may select ‘User’ rather than Admin, but in this case, you will need to click Container Permissions and select Publish.)
You’re done! This completes the server-side Google Tag Manager installation.
Please let us know when you’ve finished, so we can confirm everything is looking good from our end.
Thank you!