
Setting Up A Server-Side GTM Container Using Stape.io (RAIN's Preferred Method)
Last Updated: 4/17/2025
You should know: RAIN can complete the majority of this work for you if you’d like! The only parts that must be completed on your side are (1) setting up your Stape account with billing info, and (2) setting up a new subdomain by adding DNS records in your domain management account.
How long will this take?
As long as you have all the accesses you need, we can complete all phases of the set-up in one session.
Part 1: 5 min to set up a new GTM Container
Part 2: 10 min to set up your Stape account and create a GTM Container Server
Part 3: 10 min to configure your GTM container with your custom domain, then share access
Part 4: 10 min to create your subdomain via DNS records, and verify this in Stape
Total: 35 minutes.
Note: DNS records take only a few minutes to create, but can take up to 72 hours to fully propagate and take effect.
Accesses Needed:
You’ll need a Google account with admin access in order to set up a server-side GTM container. This should be the same account used to set up your existing (browser-side) GTM container, your GA4 account, etc.
To add DNS records, you’ll need access to the account that manages your domain name (often called a domain registrar or DNS hosting service). This is where you bought your domain name. It’s typically not the same account through which you’d edit your website’s content (e.g. WordPress).
You’ll also need a company credit card to set up your Stape billing account.
Using Stape.io is a relatively streamlined process.
The setup process is comprised of 4 parts.
Part 1: Establish a New Google Tag Manager Container
You should already have a standard (“Web”) GTM account in use. We’ll need to create a new “Server” GTM account. Here’s how:
In a new browser tab than this one, open tagmanager.google.com, making sure you’re logged into the correct Google account for your organization. You should see your existing browser-side GTM account on this page.
Create a new account by clicking Create Account.

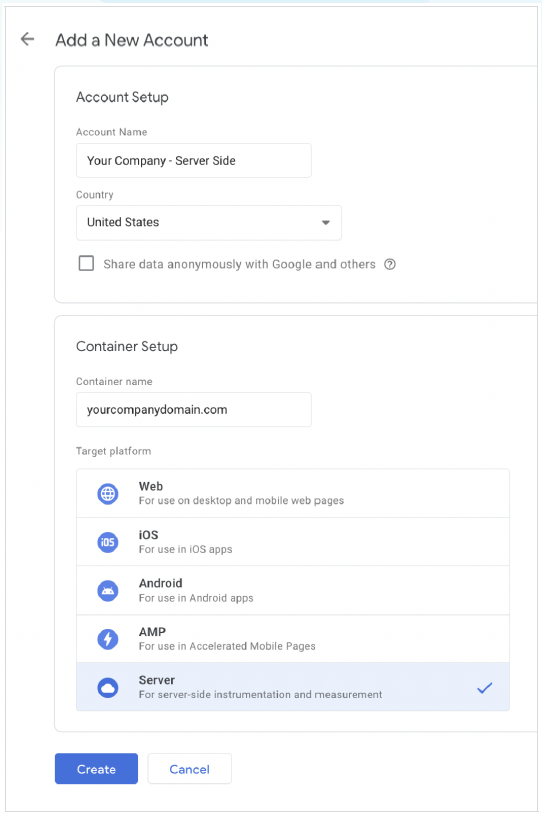
In the Account Setup section:
We suggest using the format “Your Company – Server-Side” to name your account
Leave the country as United States
Leave the box for sharing data anonymously unchecked
In the Container Setup section:
We suggest using the URL of your website to name your container. For the purposes of this example, we will be using yourcompanydomain.com.
Select Server in the “Target Platform” list
Click Create. Read through and accept the Google Tag Manager Terms of Service Agreement.
Check the box on the bottom which reads “I also accept the Data Processing Terms as required by GDPR.”
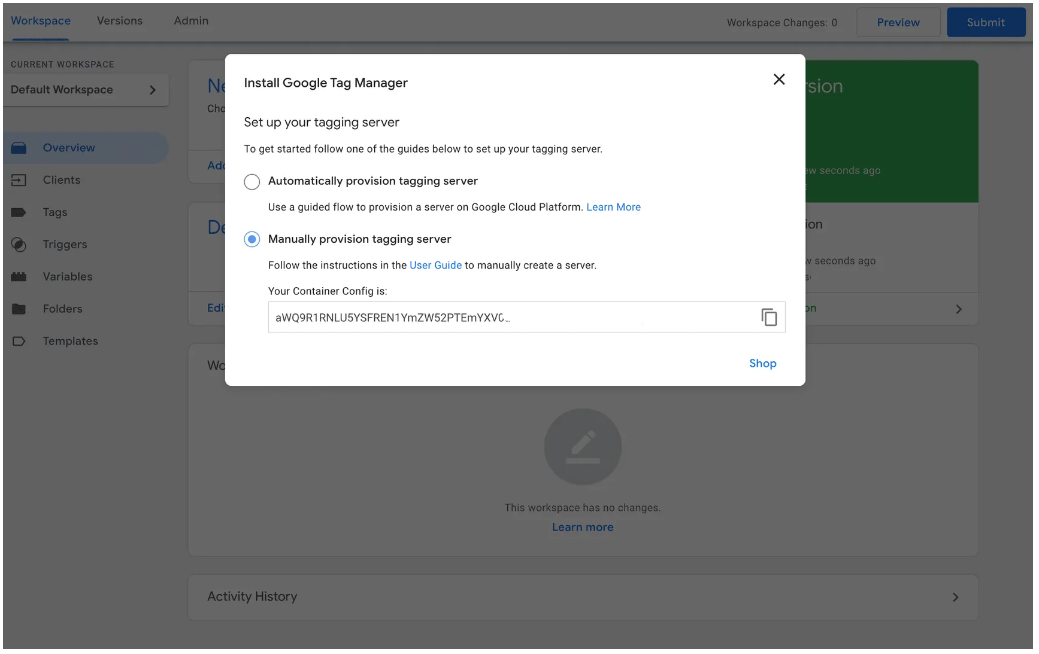
Your Server-Side Google Tag Manager (“SSGTM”) container is now created, and you will be sent to the Tag Manager interface. A pop-up will ask you how you’d like to set up a tagging server. “Automatically…” will be selected by default. Instead, select Manually provision tagging server.
Leave this tab open when you move on to Part 2 below. We will come back later to copy the Container Config code that Google generated.
Part 2: Configure a Server + Custom Domain on Stape.io
Stape has its own helpful how-to articles on how to set everything up, which you can find at the links below.
We’ve also included our own steps, which we hope will be helpful if you need direction while going through the process.
Set up a container + account in Stape
In a new browser tab, open this link to sign up for a new Stape account: https://stape.io/sign-up. We recommend using the same email that has admin access to your GTM.
Select “Global” (not EU) and make sure to check the Terms of Service box.
Once you’ve received the welcome email and set your password, you should arrive at your Dashboard.
Find and select the + Create sGTM Container button.

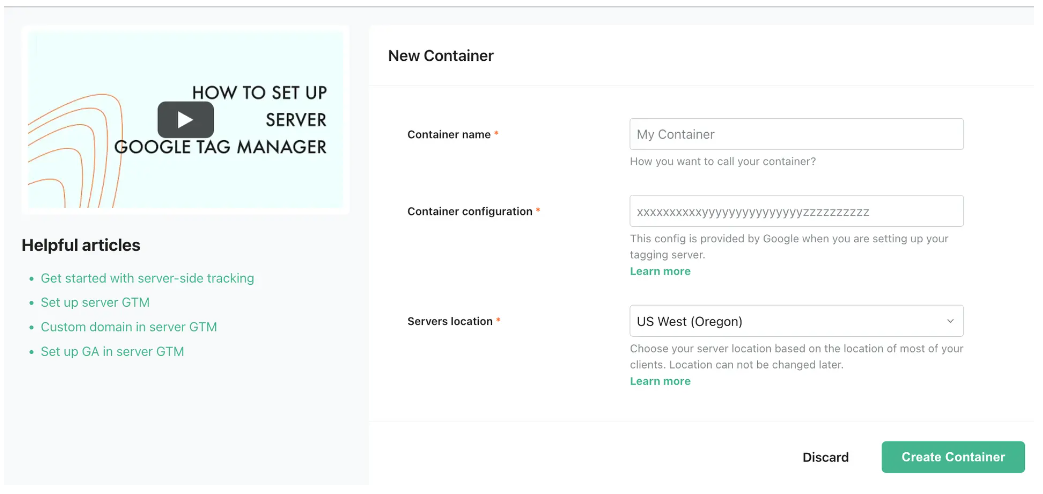
a. Add your container name (we recommend using your company’s domain name, the same name we used for your new GTM container in Part 1, Step 2b).
b. Go back to the Tag Manager tab you left open. Copy the Container Config code and paste it in the Container configuration field here.
c. Finally, select the server location that is closest to your geographic location, and click Create Container
You’ll now need to select a payment plan. We recommend selecting the Free plan, and clicking ‘Upgrade Automatically’.

To get an idea of what you’ll end up paying per month, use Stape’s pricing calculator linked below. You’ll need to know how many GA4 events you get each month, but Stape helps with that too. Just click the “Where to get this number?” link on that page.
https://stape.io/price#calculator (remember to open in a new tab)
It’s now time to set up your billing account. Select your country and state, fill in your billing information, and then save it.
Finally, you’ll be routed back to your Dashboard view again, where you will see the status of your container, container config, and plan name. It takes around 5 minutes to deploy a server container. Please reload the page to update the status after that time. If the setup was done correctly, you should see the status “Running.” If you see “Error,” please check that you’ve copied and pasted the correct container config. If the error repeats, contact Stape’s support team.
Add a custom domain in Stape
In order to get the primary and maximum benefit of server-side tagging, it’s essential to set up a custom subdomain for your server using your existing domain rather than the default one Stape uses by default.
Stape’s instructions: Setting up a custom domain
In the “Domains (Tagging Server URLs)” section, click on Add custom domain.

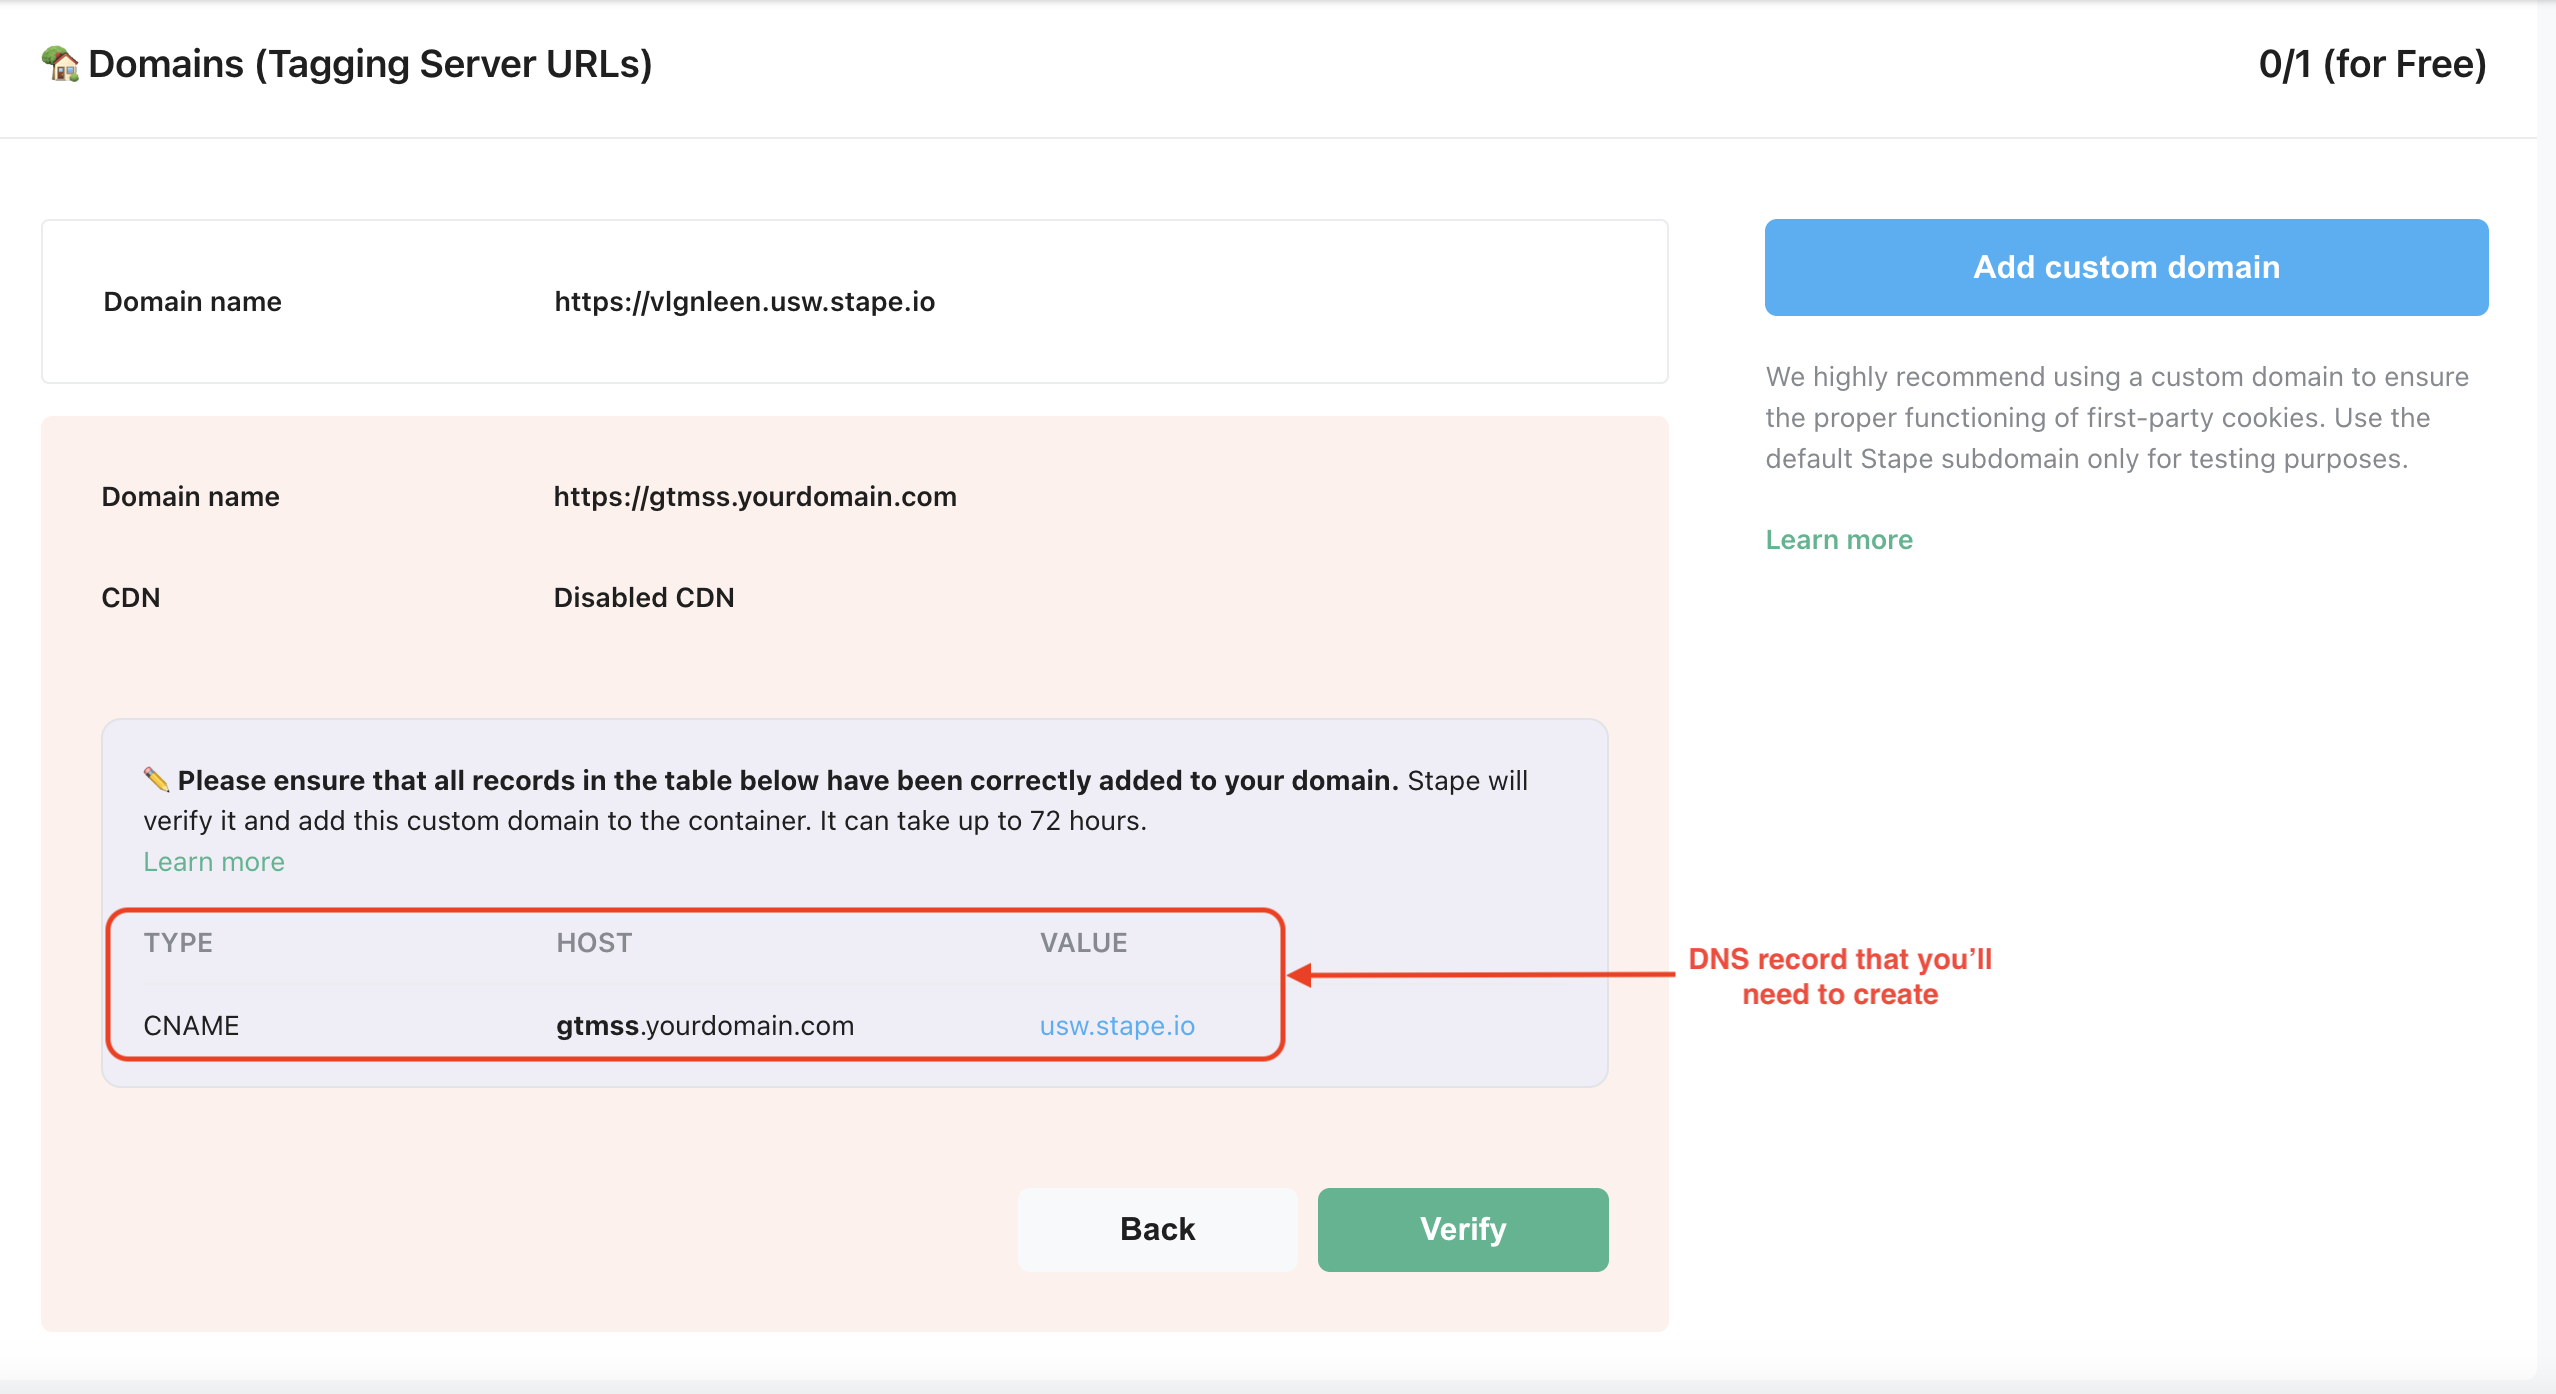
Once clicked, you’ll see an orange section open. In “Domain name”, fill in the full domain name of your choice, including your chosen subdomain. A subdomain is the part before your main domain (for example, university.rainlocal.com). You can use any subdomain name you want, such as “gtmss” or “sst”.
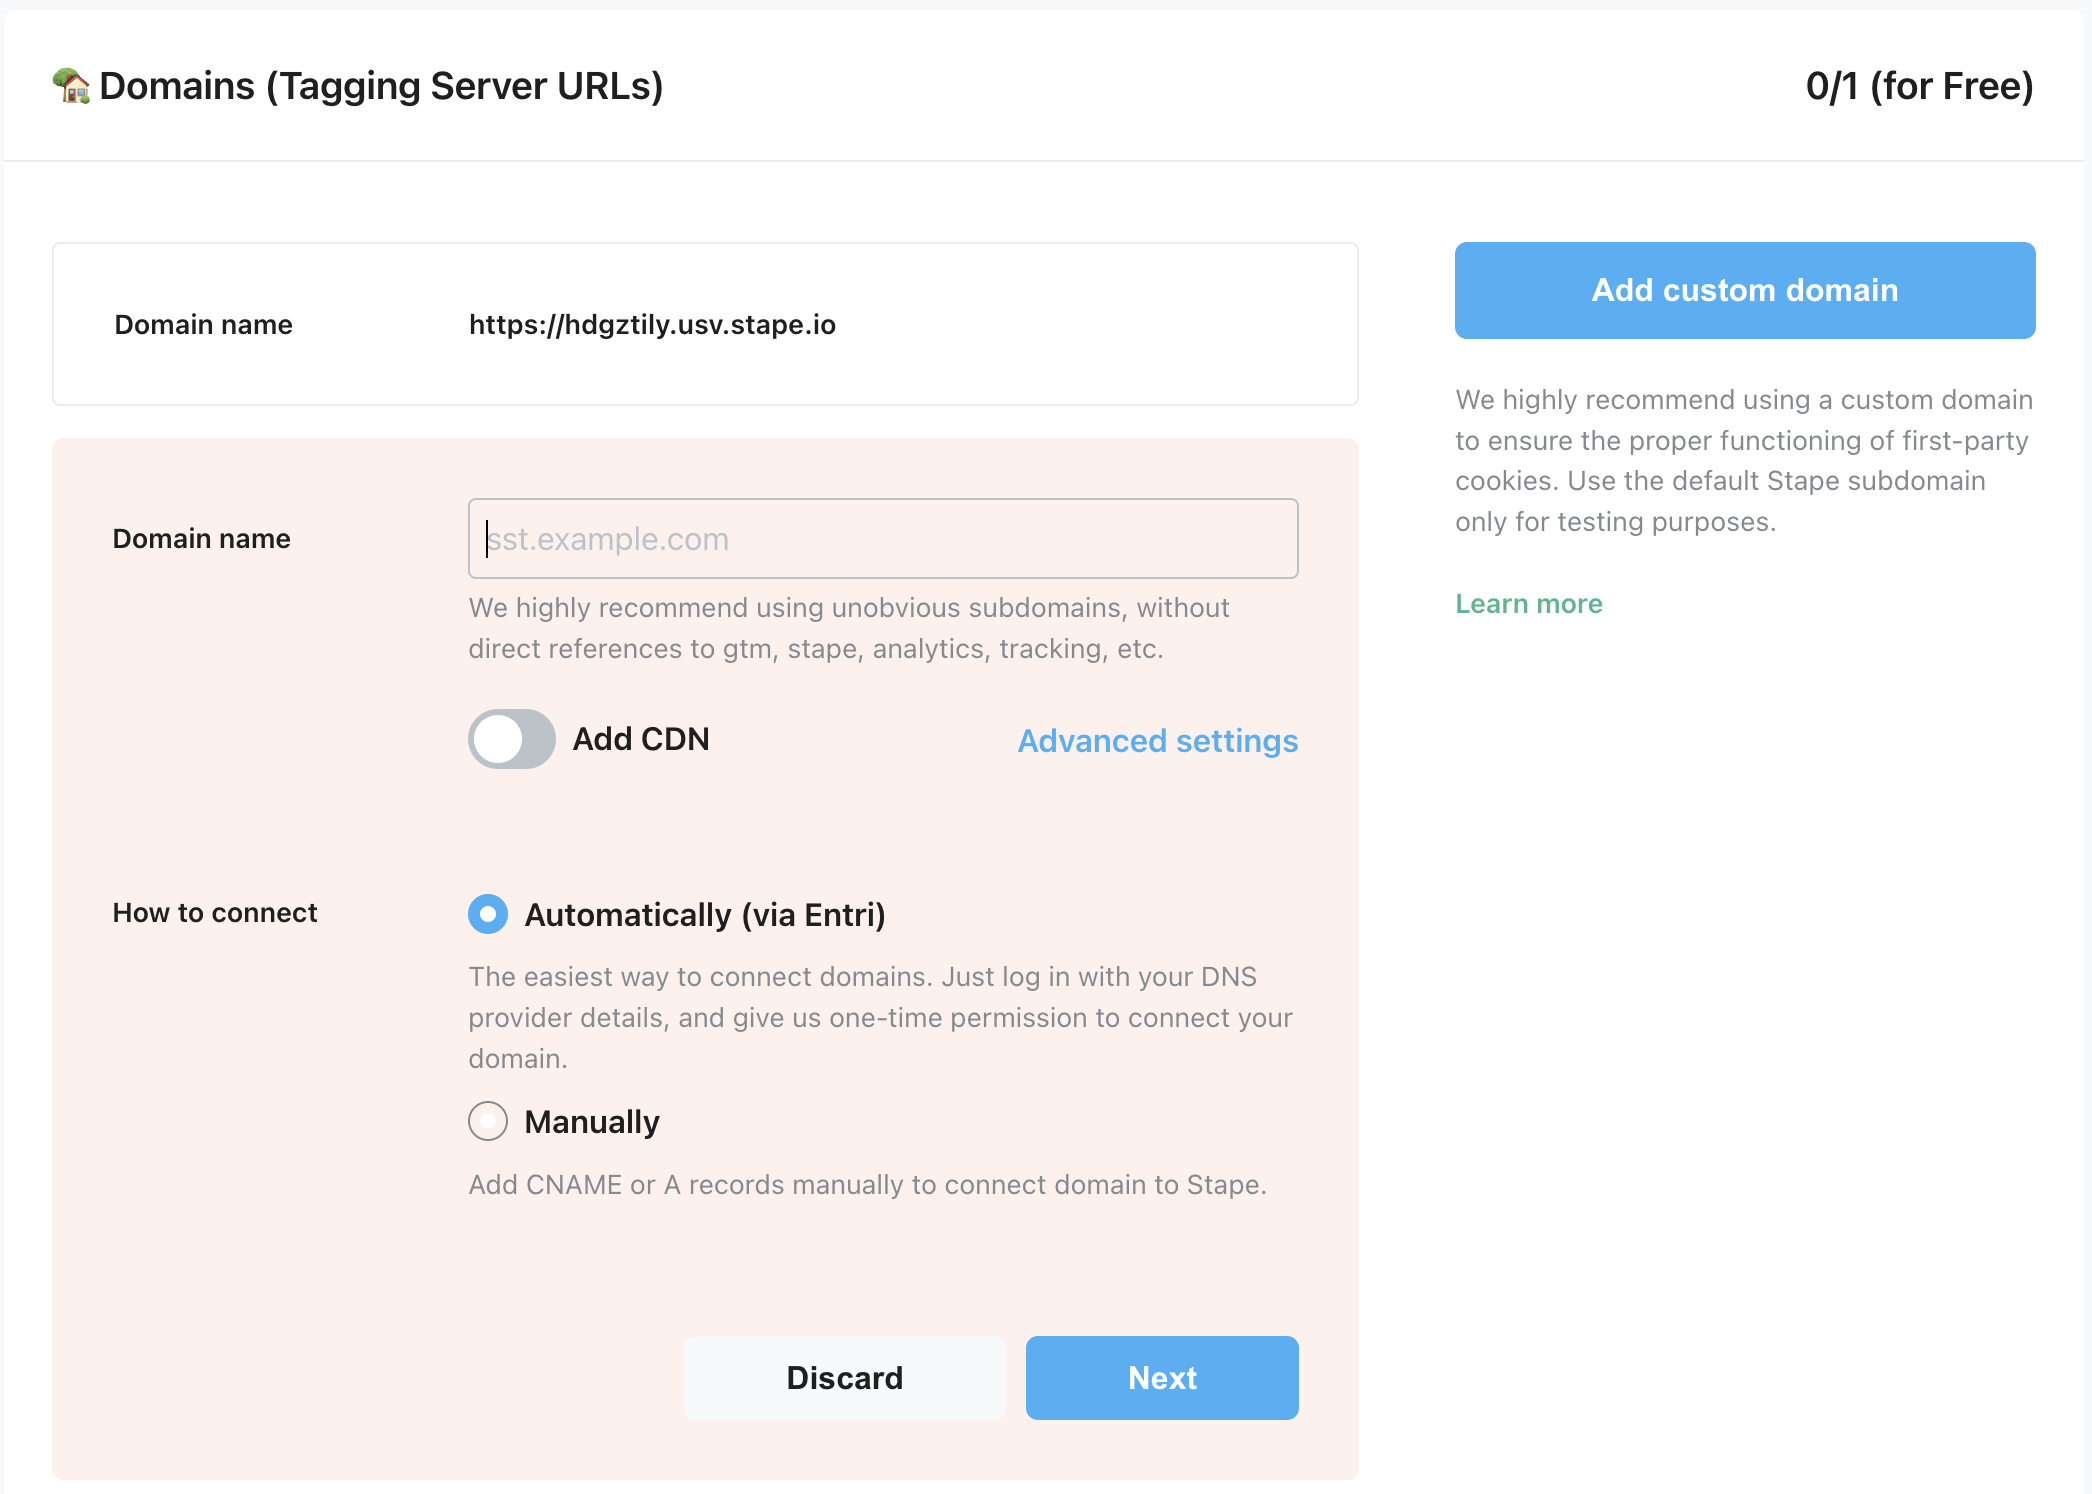
Here, you have options. You can use Stape’s offered service “Entri”, or set it up manually below. We’ll let Stape walk you through Entri, but have included some additional information regarding manual setup below.
The below screenshot is an example of what you might see after selecting Manually and then clicking Next:
For now, leave this tab open and move on to Part 3.
Part 3: Configure + Share your GTM Container
It’s time to go back to Google Tag Manager and add the custom subdomain URL you just added to your Stape server, so they match. Here’s how:
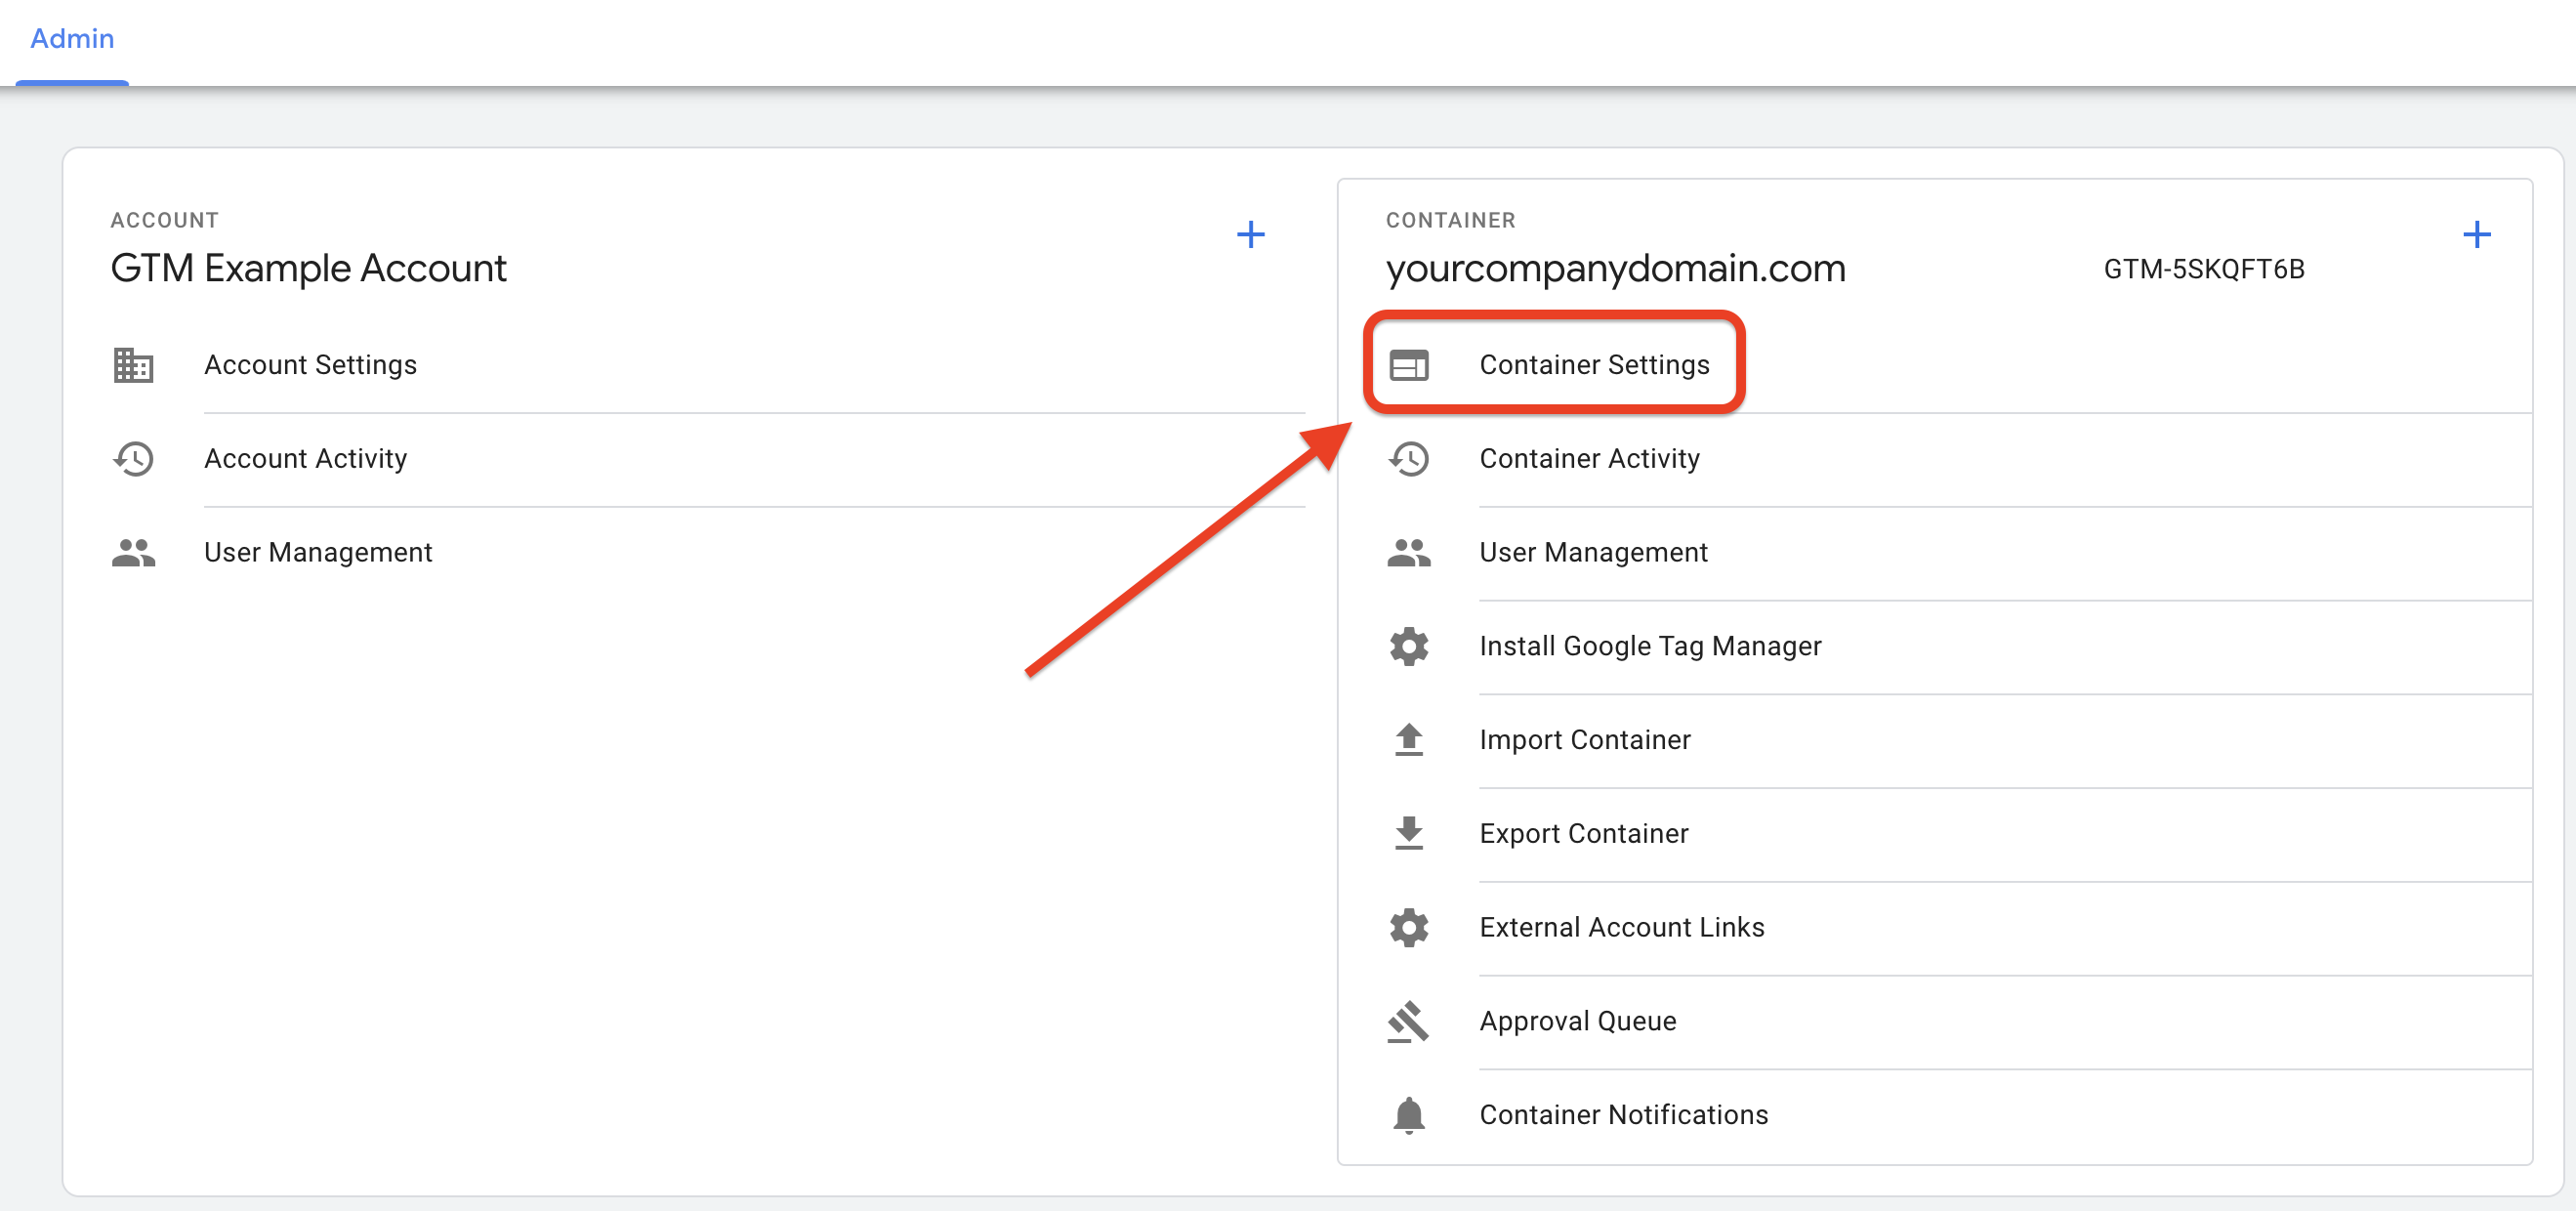
Go back to the Tag Manager tab you still have open. Navigate to your Container Settings. You can find that in the Admin tab once you close out of the pop-up you had opened.
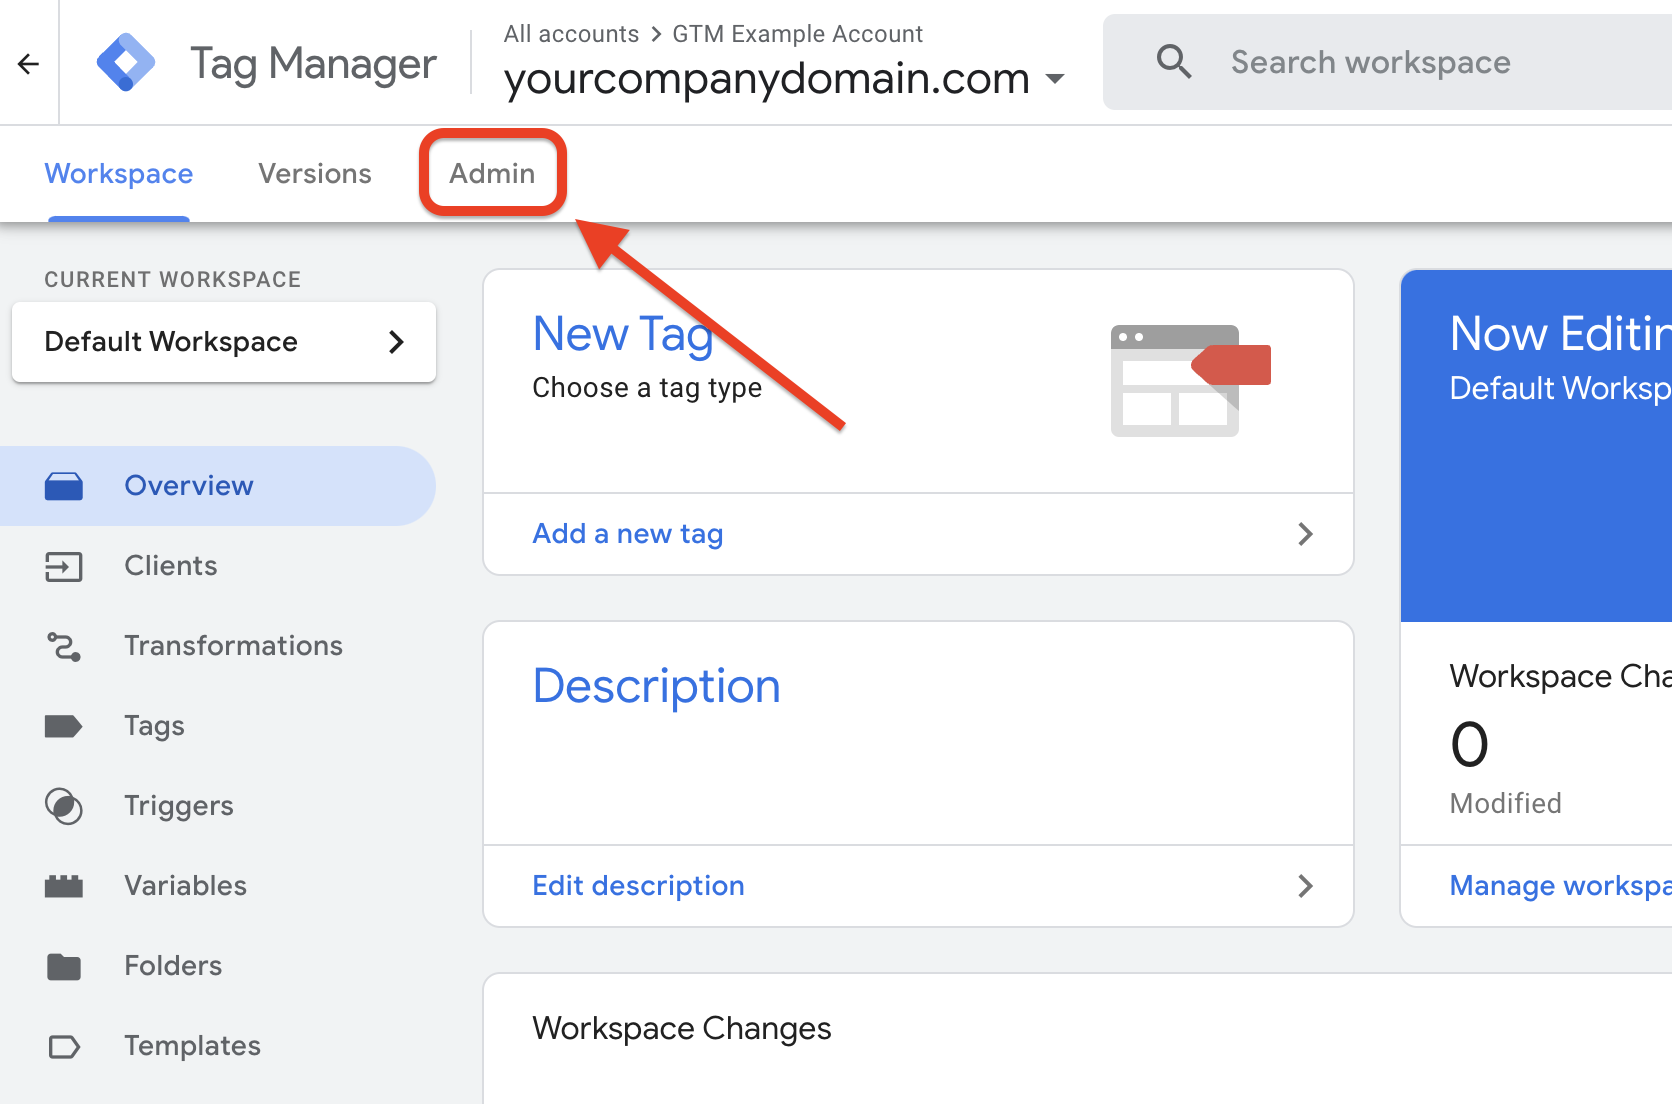
a. If you had navigated away, re-open tagmanager.google.com in its own tab and ensure you are still logged into the correct Google account. Click on the ⚙️ Gear Icon in your “Server” GTM account.

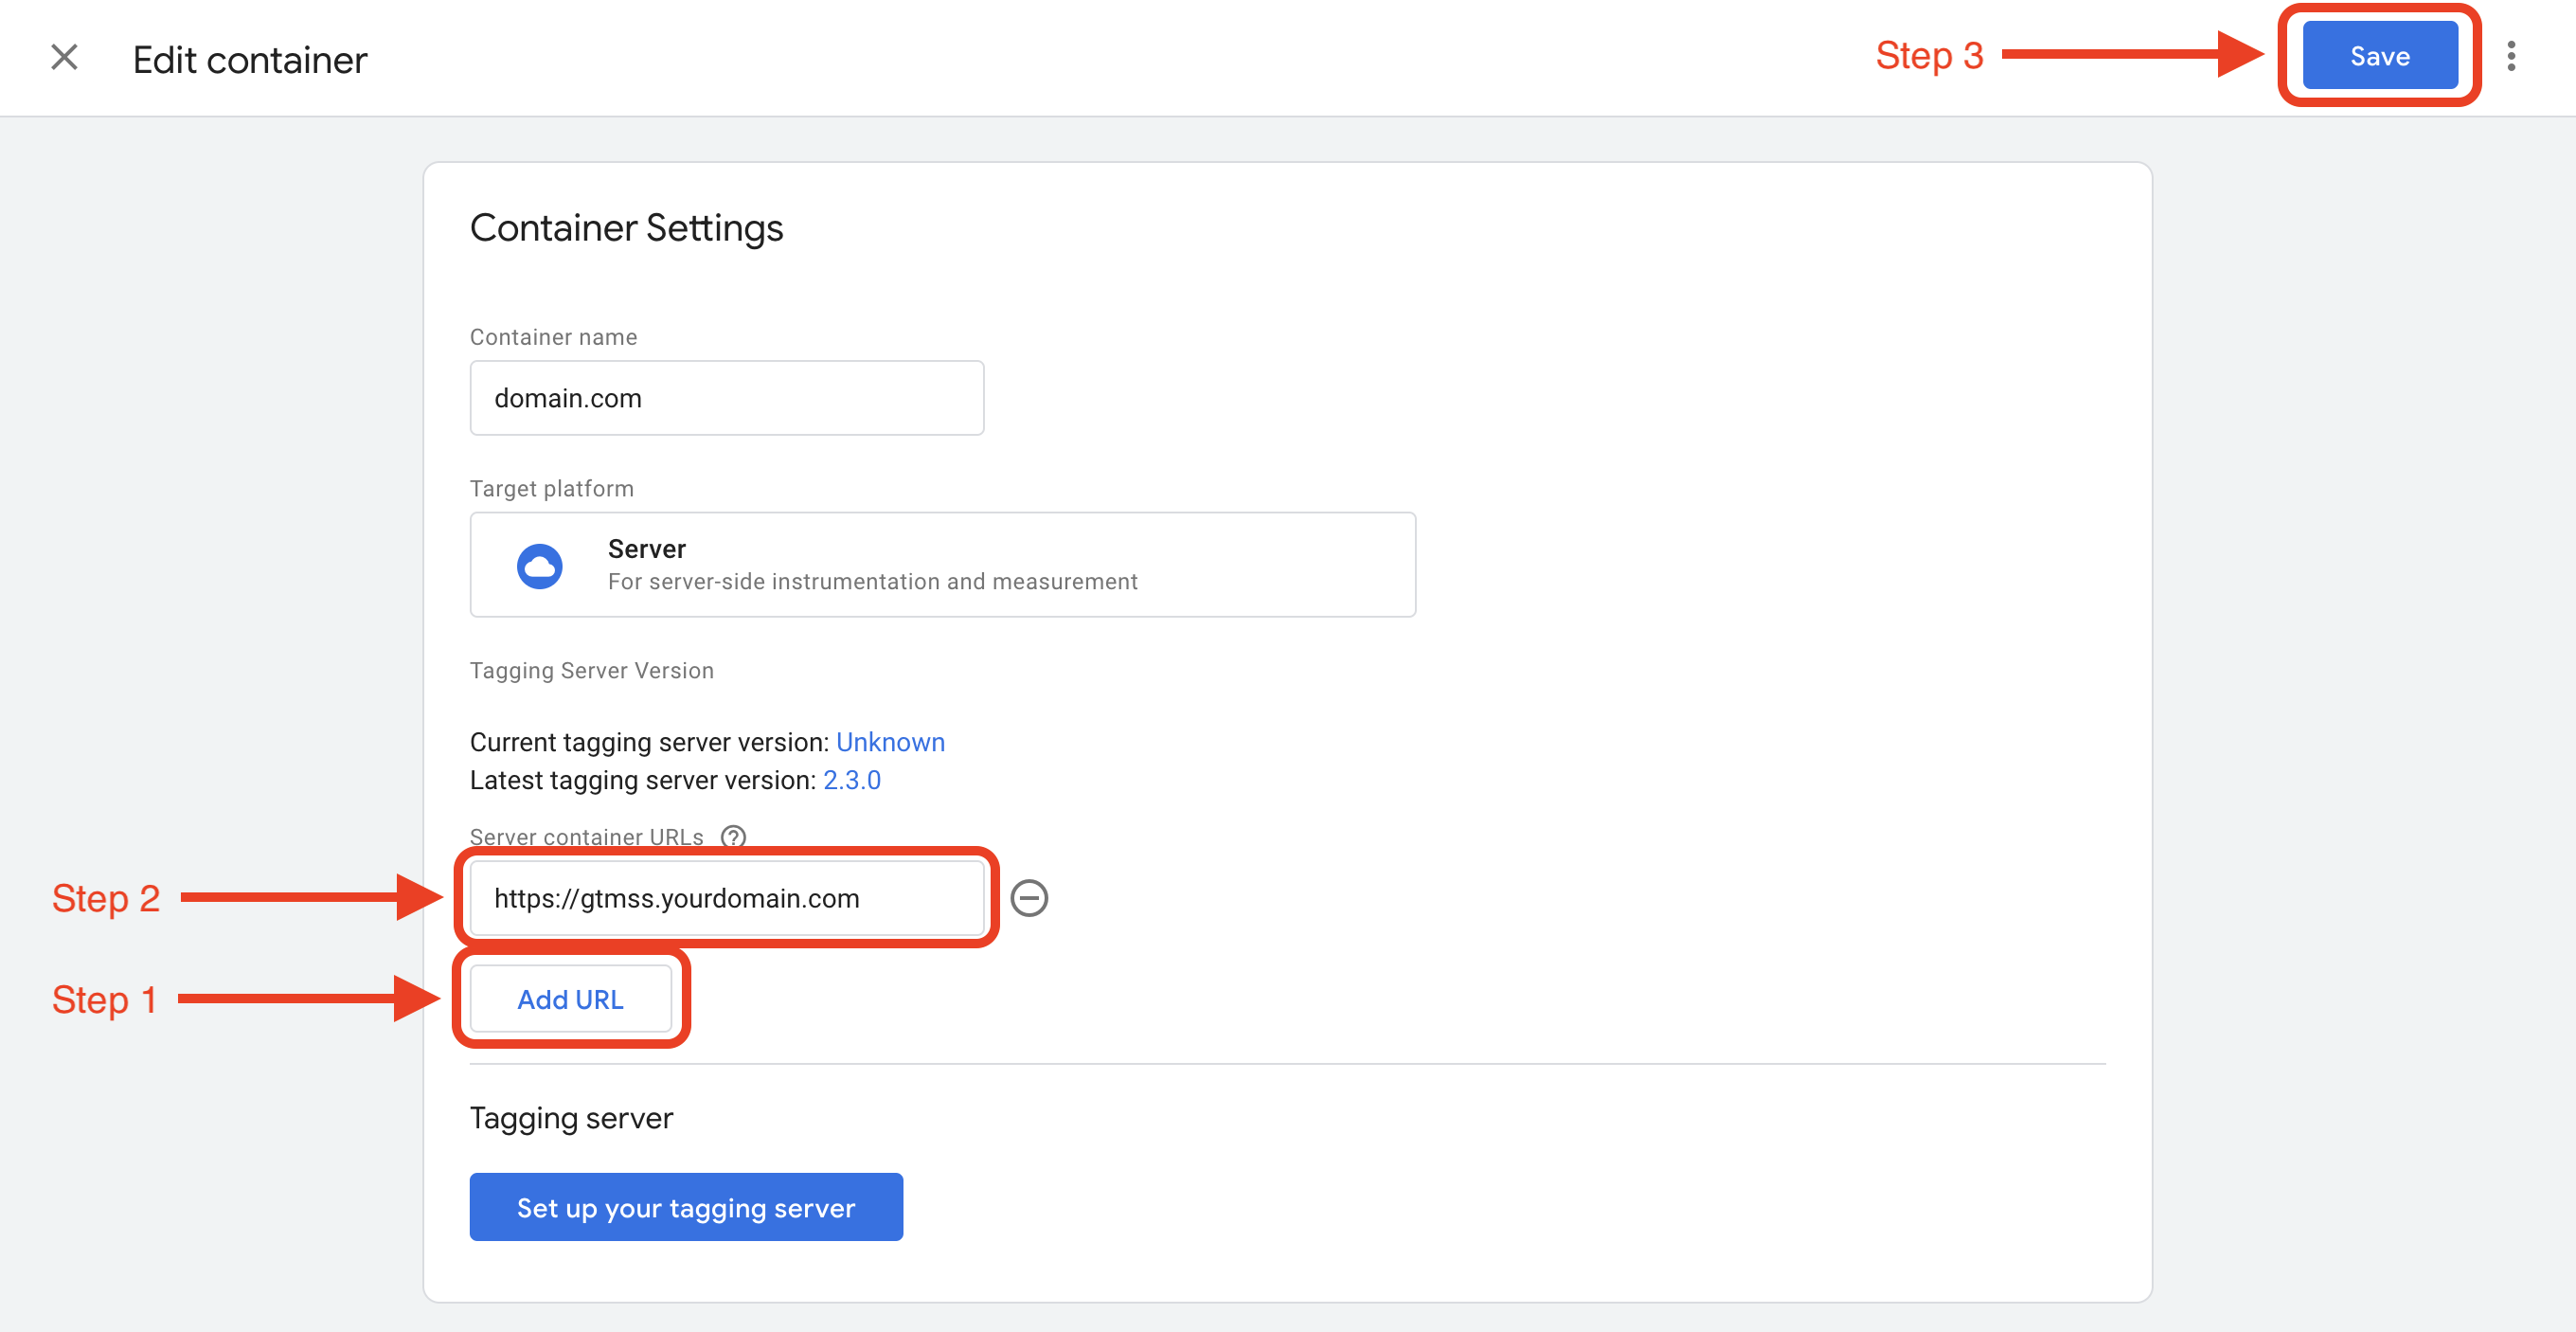
Click Add URL, enter the same custom domain you just set up in Part 2, Step 9
Note: The field to paste in the URL will not be visible until you click the Add URL button.
You’ll need to include “https://” at the beginning, and ensure there is no “/” at the end.
Click Save at the top-right of the screen.
(Do NOT click “Set up your tagging server” again – we’ve already done that.)
Finally, it’s time to share your new Server Side GTM Container with RAIN so we can begin using it.
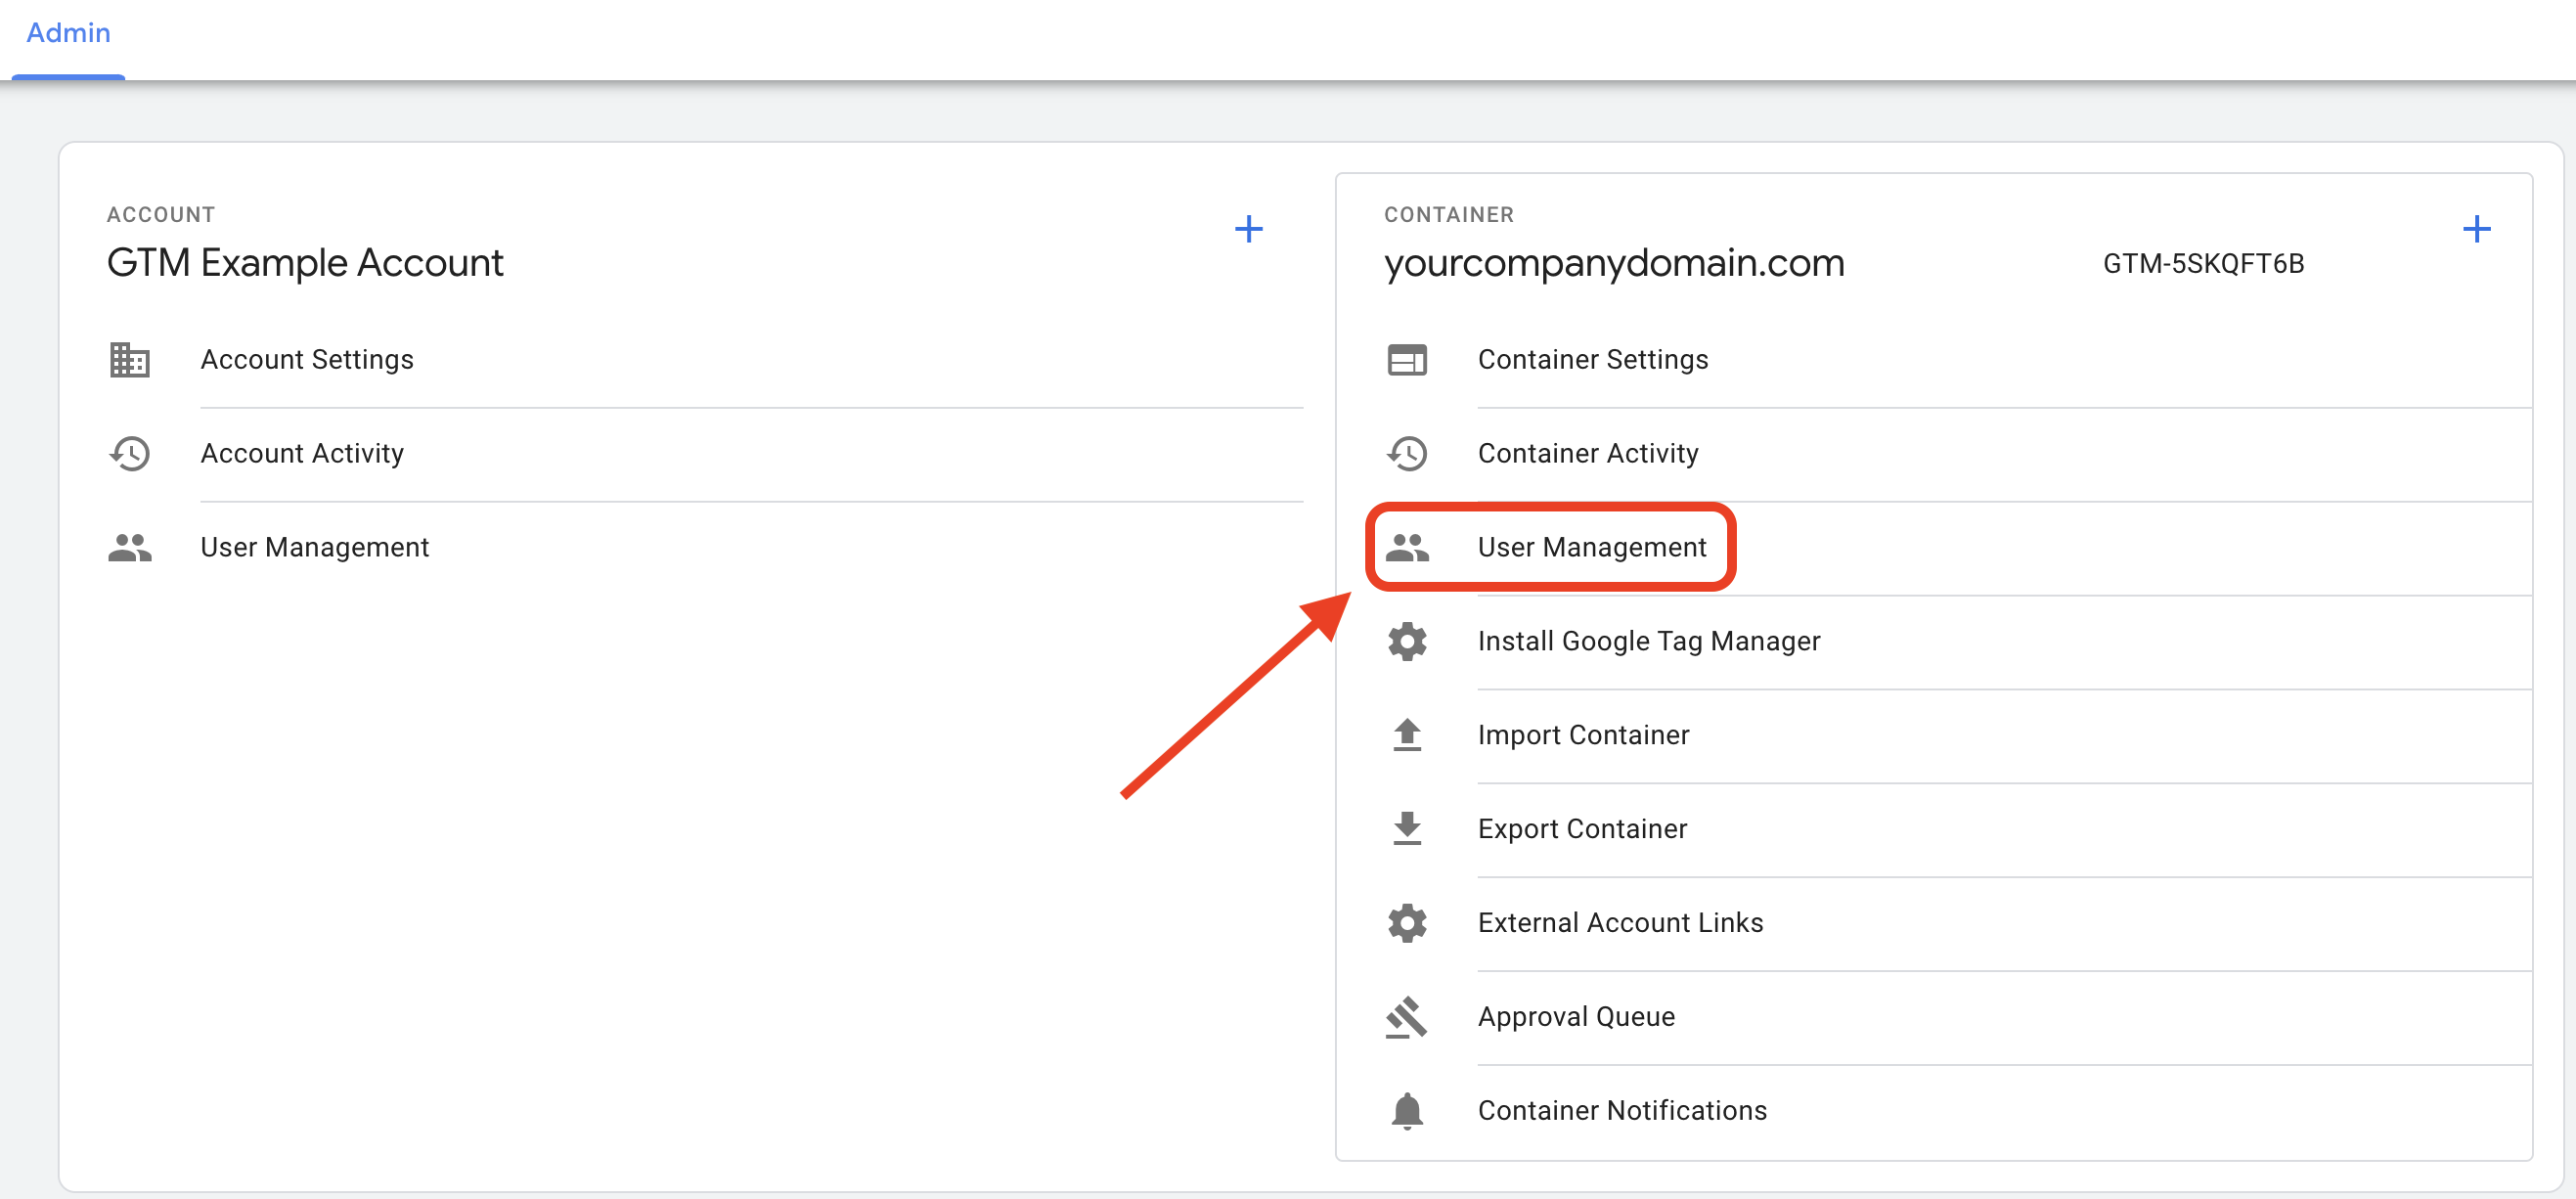
Get back to your Admin view and Click on User Management on the right side of your Admin view (the “Container” section)
Click on the
 icon on the top-right of your screen, then select the Add Users option.
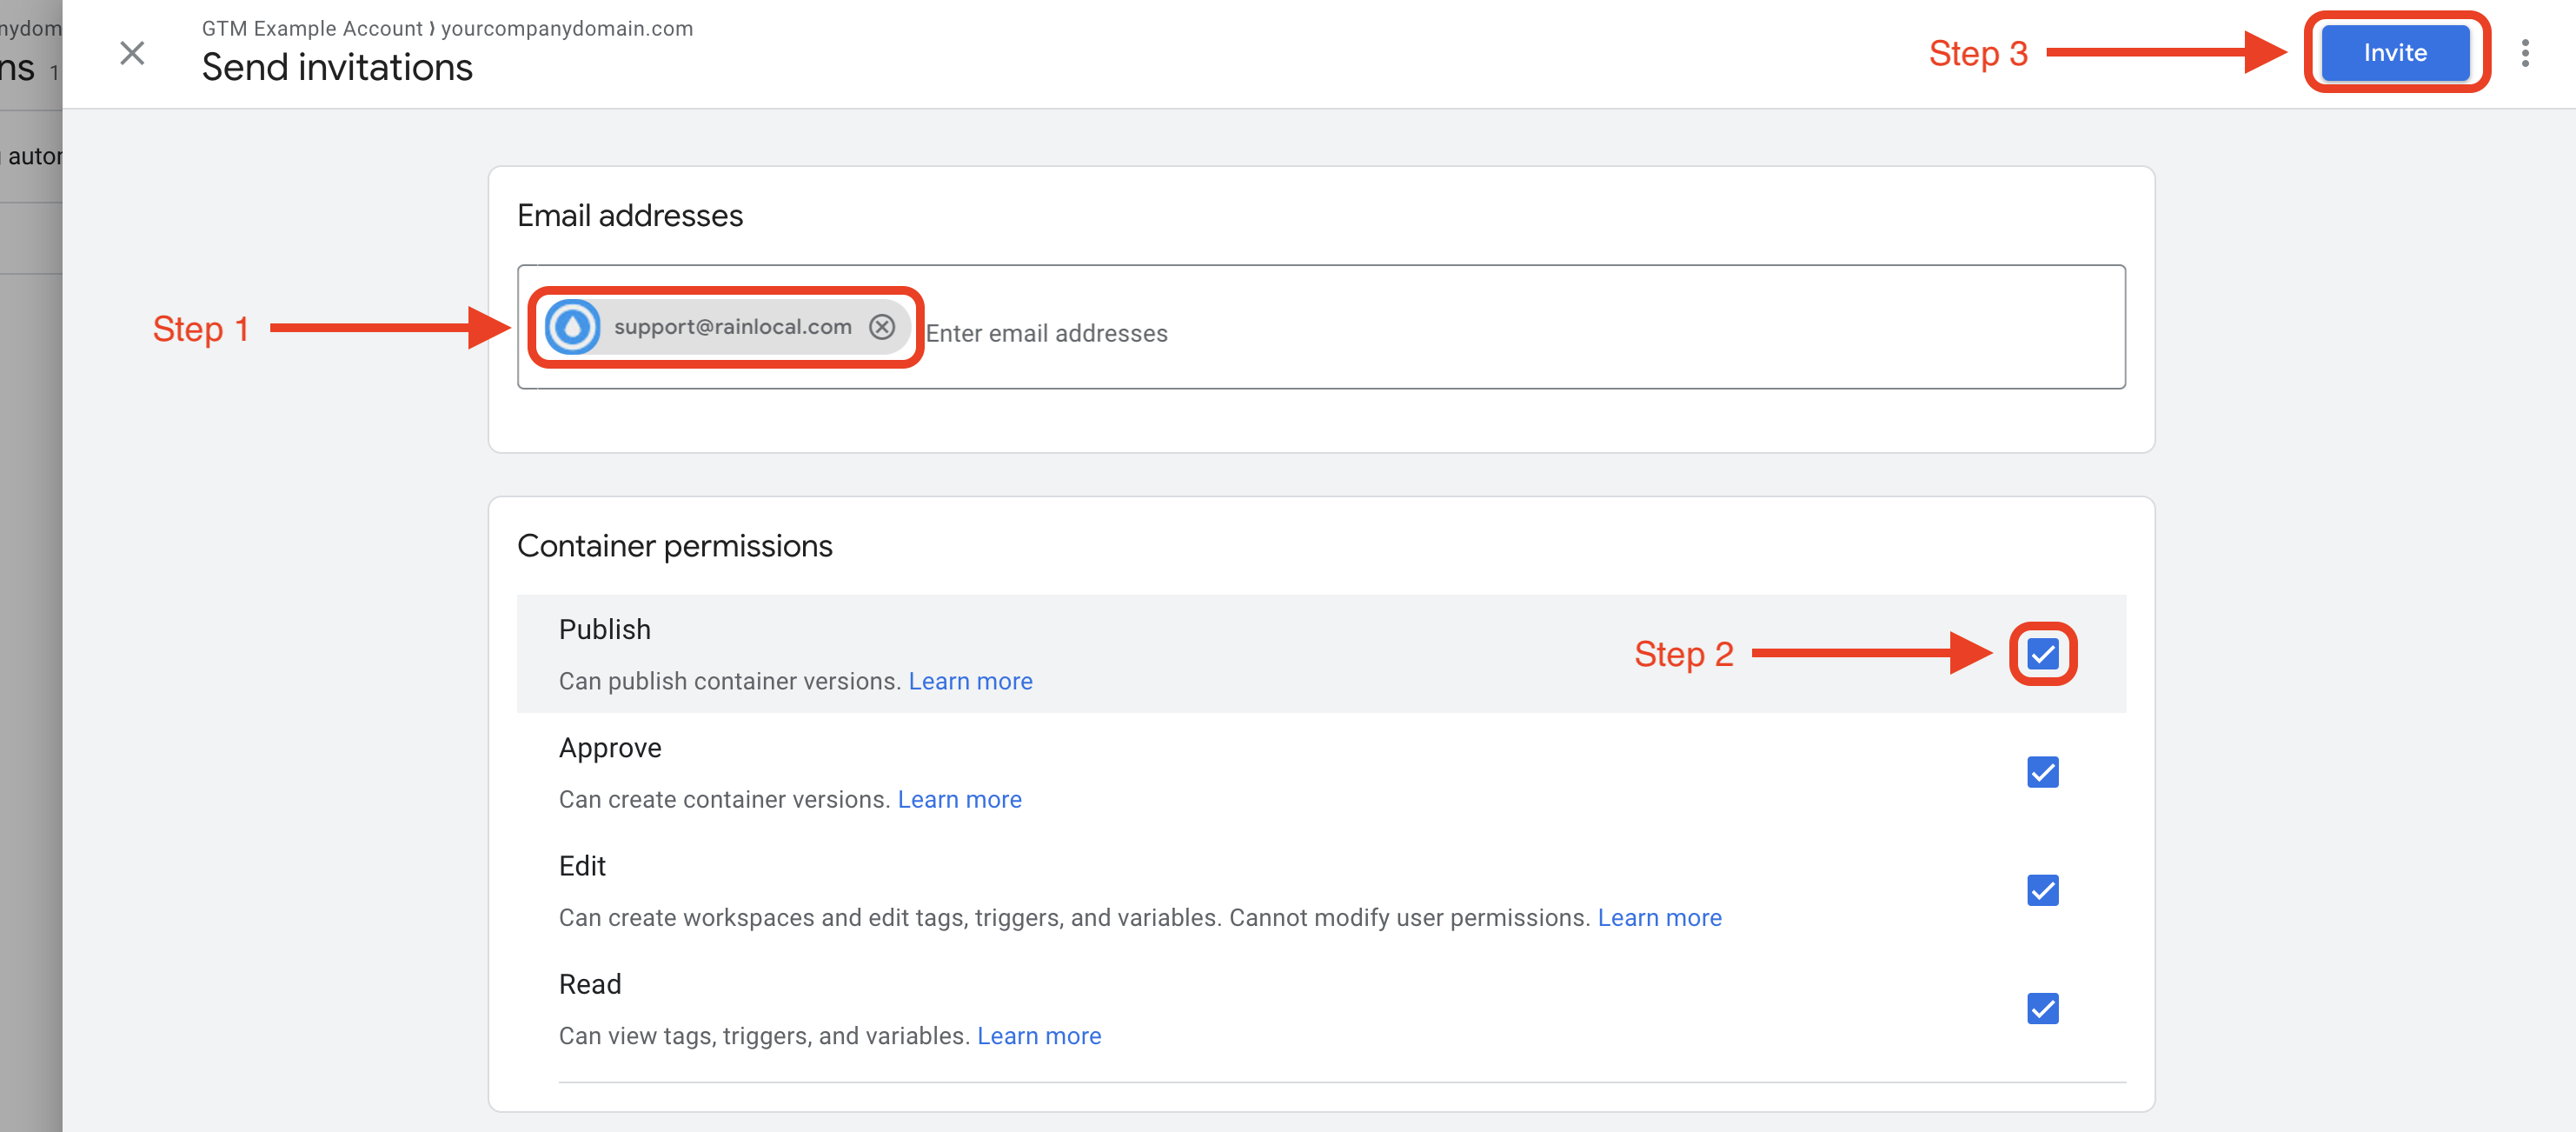
Enter support@rainlocal.com, check the box for Publish access (which will automatically select all the checkboxes). Finally, click Invite.
You may now close this tab. We’re done with Tag Manager!
Part 4: Configure and Verify a Custom Domain
The final thing to do is manage your website’s domain settings to create your subdomain, then start the verification process in Stape. Let’s do that now.
Note: This is typically the most critical portion to not mess up as DNS settings dictate core functionalities of your website. Done right, there should be no impact on your website at all other than adding server-side GTM tagging capabilities, but many of our clients prefer that we do this part together with a member of their IT team who is knowledgable and comfortable in DNS settings management.
In a new tab, log into your domain name registrar or DNS hosting service.
You’ll also need to keep your Stape tab open as we’ll be referencing some information there.
Navigate to your website domain’s management or control panel section. This might be under Products / Domains, DNS Settings, Name Server Management, or something similar.
Find a link to manage DNS records.
In the GoDaddy platform, the clicks from the Home section are: All Products → Domains → (Find the correct domain) → “…” Menu → “Edit DNS”
Once you’re in the right place, you should see your existing DNS records in a list/table. These might include “A”, “CNAME”, “MX”, “TXT”, and/or other DNS record types.
Before you add any records, you’ll want to back up your current records. This protects you in case you do something wrong. Make sure you understand how to do that and to back up from a backup file, if needed.
Here are the steps to add the correct new DNS records to create your subdomain:
In your DNS records management section, click the button to Add a DNS record
It looks like this in GoDaddy:


This is what adding a new record looks like in GoDaddy.

Fill out the information for the new DNS record using the information generated in Stape.
Copy/paste as much as possible to ensure you do not enter anything incorrectly. Make sure to also remove any errant spaces or extra characters.
Type: should be a drop-down. Select “CNAME” from it.
Name or Host: “Name” is the same as “Host” as seen in Stape Important: Unless your platform specifically asks for the full URL, only add the part you see bolded in Stape (e.g. “gtmss” — our new custom subdomain)
Value (or “Points To”): Enter exactly as it is in Stape. In this example, the value is usw.stape.io
TTL: Leave at default setting (e.g. 1/2 Hour), or select Auto.
Proxy Status: Disable If you don’t see Proxy status as an editable field, don’t worry. It will be disabled by default.
Click Save to finalize the records.
Review and Confirm: It's always good practice to review the newly entered DNS records to ensure they’re correctly configured, matching the information in Stape exactly.
Back in your open Stape tab, finally click Verify.
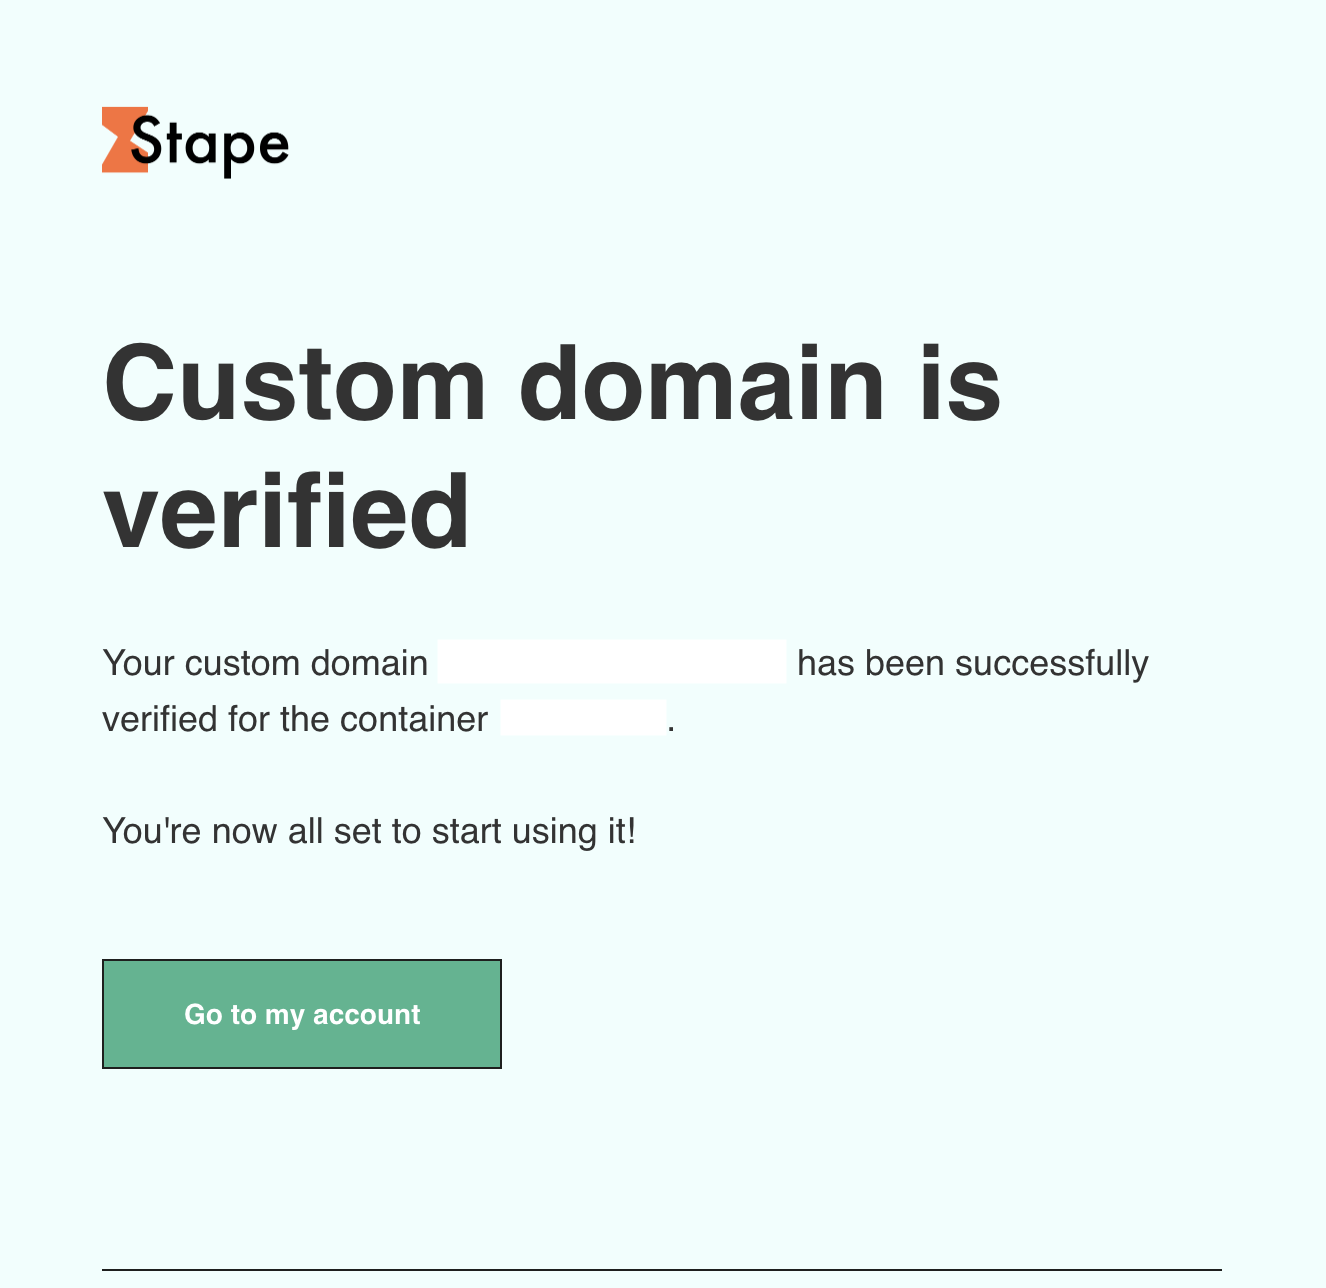
It usually takes a few hours (potentially up to 72) for DNS records to come into effect. Once you click Verify, it’s time to wait. Soon, you should receive an email such as the one below.
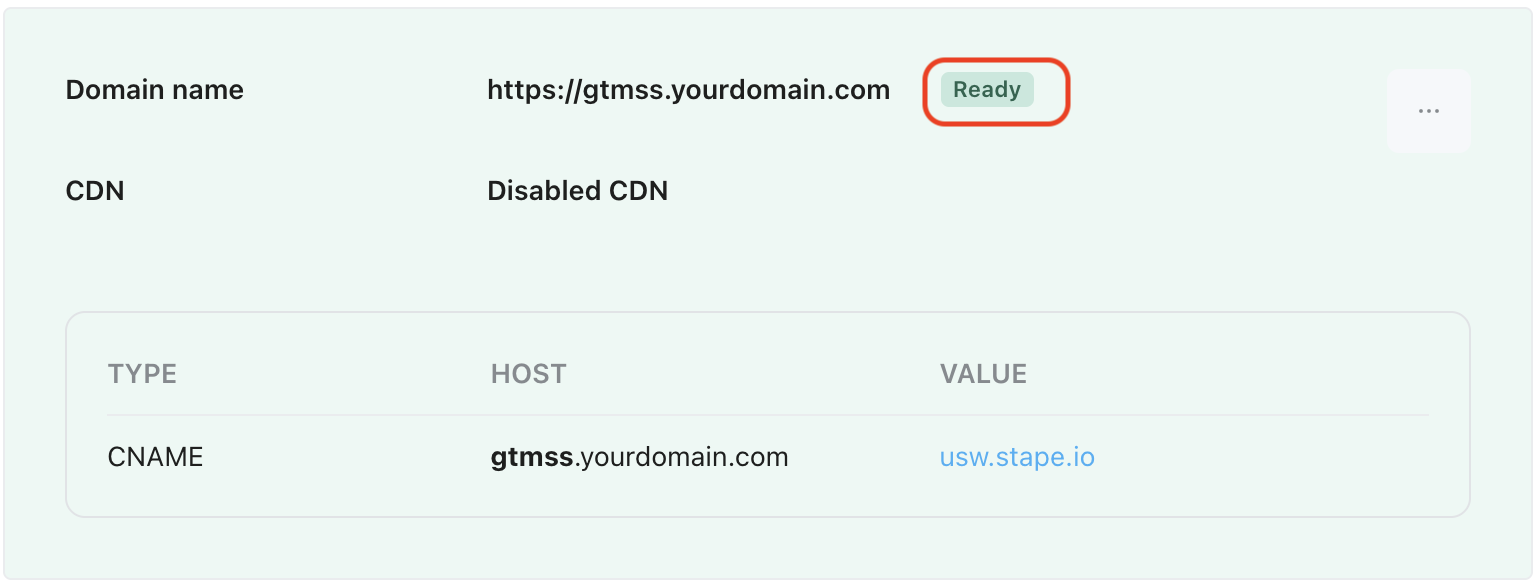
At this time, when you log back into Stape, you’ll see the previously orange section turn green and read “Ready,” as in the screenshot below.
Congrats — you’re all done!
Please let us know when you’ve completed these steps, so we can verify everything looks good on our end and continue the tag setup process. We’ll be in touch!
Important Note
1. If you have a Content Security Policy (CSP) enabled, you must add the server endpoint (the new subdomain you created) as a trusted source in your CSP. This should be added to both connect-src and script-src directives. Otherwise, the browser will block those requests.
Furthermore, the below cases may be relevant, depending on your set-up.
2. Explicitly Define Google Tag Manager in CSP
Include rules for GTM’s client-side scripts in script-src and ensure that any dynamically loaded resources (e.g., analytics.js or gtag.js) are accounted for.
3. Use Nonce or Hash for Inline Scripts
If your implementation requires inline scripts (e.g., custom JavaScript in GTM), use CSP with nonces or hashes to allow only trusted inline scripts to execute.
Please get in touch with our team if needed! Oftentimes, it can take some time to determine what steps are needed, and some testing may be required. This is normal, and we’re used to it. We’re happy to troubleshoot any specific cases with you, just let us know!